
PEX tubing, also known as cross-linked polyethylene tubing, is a popular choice for plumbing projects due to its flexibility, durability, and cost-effectiveness.
However, to properly install PEX tubing, you may need to bend it to fit around tight corners or through tight spaces.
Bending PEX tubing can be done in a few different ways, and in this article, we’ll show you how to bend PEX tubing using a few simple tools and techniques.
Whether you’re a professional plumber or a DIY enthusiast, this guide will help you navigate the process of bending PEX tubing like a pro. So, let’s get started and learn how to bend PEX tubing!
Three Popular PEX Tubing Bending Methods Explained
PEX tubing is easy to use, which is one of the many benefits of using it for plumbing projects. There are few special tools required to cut and join PEX; it is inexpensive and cuts and joins easily.
In addition to its ease of bending, PEX tubing is also very lightweight. You can use one of three methods to make turns on PEX tubing:
Method 1. Bending PEX With Clamps
A PEX clamp is an individual piece of plastic with a nail attached. Nailed over the top of the pipe, the clamps hold it in place. Unlike bend supports, they allow you to make various turns, from tight ones to wide, sweeping ones.
Step 1: Examine The Nailing Surface
Using clamps for bending PEX, wood must be used as the nailing surface. It must be flat and sturdy to prevent the nails from pulling out of the wood. The clamps are under stress when PEX is initially bent with clamps.
Step 2: Mark The Intended Curve
The PEX tubing should be marked with a pencil and a straight edge or Speed Square. It is usually easier to mark an angle with two straight lines rather than a curve. Doing this will allow you to determine the angle more easily.
Step 3: Nail Down One Clamp
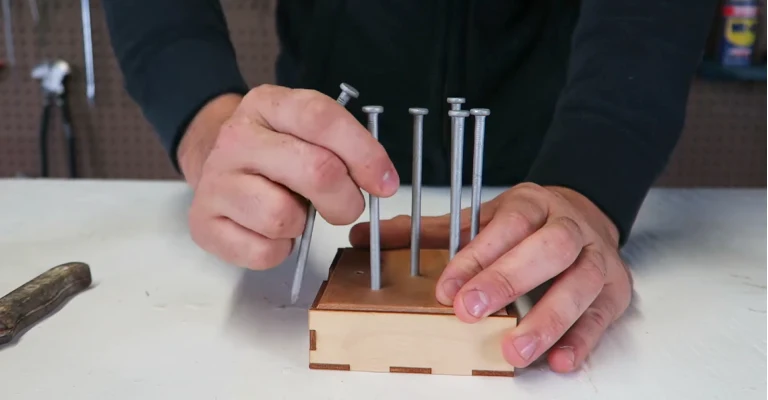
Nailing a PEX clamp to the board on one side of the curve is the best way to secure it to the board. Make sure you do not break the plastic sleeve on the clamp. The clamp should be able to hold the PEX tube.
Tip: You should nail the clamp over a pipe rather than start a new one.
Step 4: Bend the PEX Tube
To bend the PEX tube into the desired position, bend it slowly. It may be necessary to hold that end of the tube to prevent stress from pulling out the first clamp.
Step 5: Nail the Second Clamp
Taking the second clamp, place it over the PEX tube. Secure it with a nail. After the clamps are firmly secured, release your grip on the tube.
Method 2: Bend PEX With a Bend Support
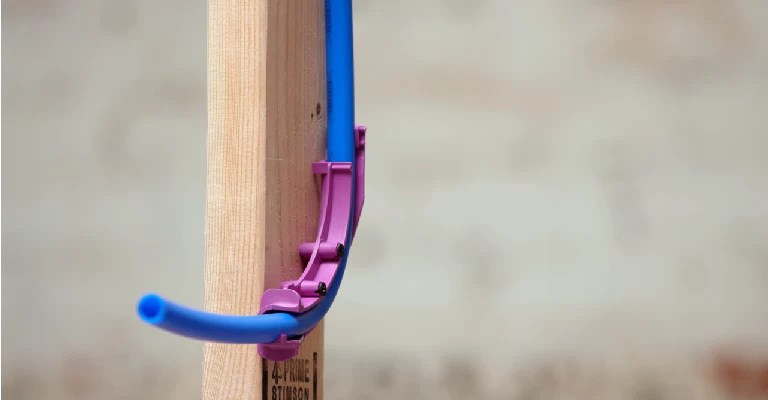
It is a device that holds PEX down for a 90-degree turn, which is a 1/4-turn metal or plastic device. Some supports come with nails that can be used to secure them to the surface below.
By bending the PEX through its tightest allowed 90-degree turn, bend supports to prevent it from folding or crimping. The radius of turn varies based on the diameter of the PEX pipe. Most PEX pipe can have a 5-inch radius at its tightest point.
Step 1: Warm the PEX Tube
Even though PEX tubing bends well, if bent incorrectly, it can crimp, using a heat gun at the lowest temperature setting or letting the PEX tubing sit in a warm room is an easy way to warm it up.
Step 2: Push Into One Side of the Bend Support

The PEX tubing should be inserted into one side of the bend support. Ensure that the tubing remains pliable by working quickly.
Step 3: Bend the PEX Tubing
As you bend the PEX tubing, ensure it matches the bend support curve. Bending the tubing too quickly will cause it to crimp and fold.
Step 4: Push Into the Other Side of the Bend Support
You will need to push the tubing into the bend support until it clicks into place when the contour of the tubing matches that of the bend support.
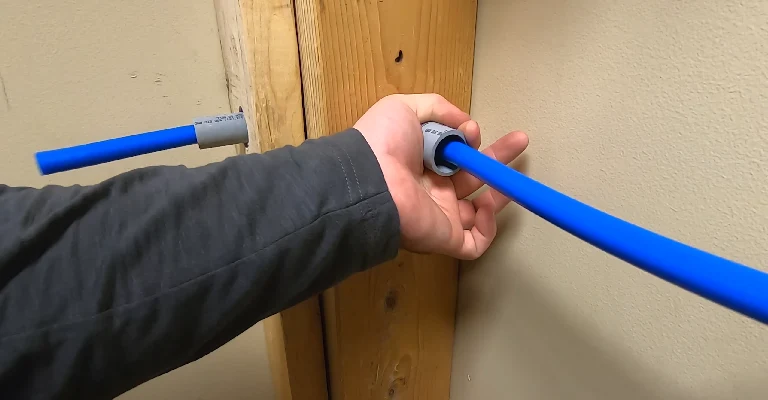
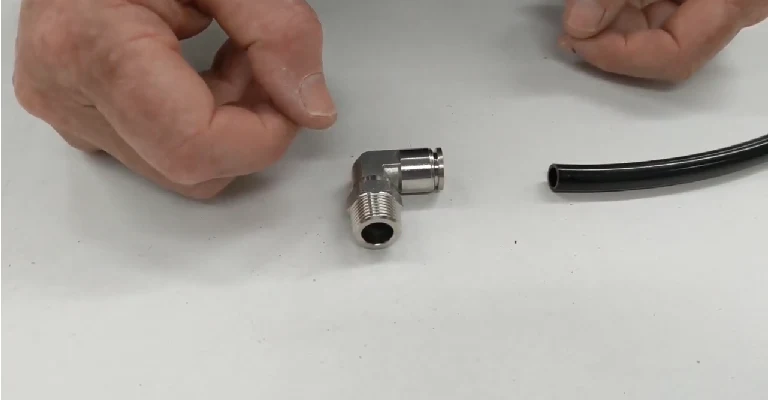
Method 3: Bend PEX With a 90-Degree Elbow
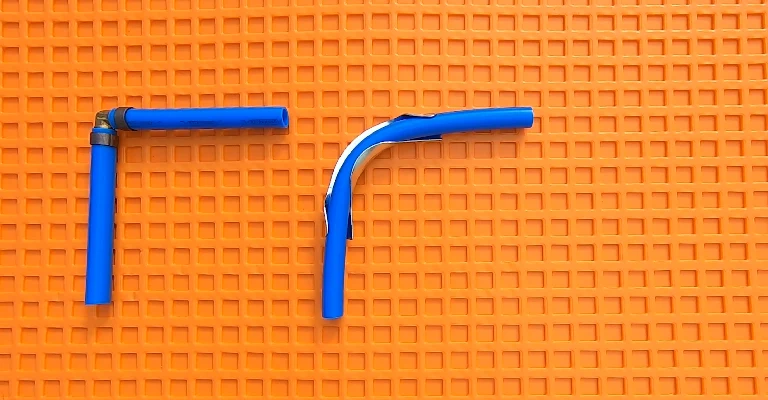
Elbows are L-shaped fittings that create a 90-degree bend in PEX pipes. The elbow bends the PEX tubing, not the tubing itself. An L-shaped connector connects two straight PEX tubing sections at a 90-degree angle.
A push-fit 90-degree elbow allows you to insert PEX tubes directly into it without requiring any other tools (although a PEX cutter and PEX removal tool may be necessary). Alternatively, crimp-fit joints may be used.
Pushing PEX tubes over brass fittings is the method used to install them. To seal the ends of the PEX tubing, brass rings are crimped over them with a special tool.
Step 1: Clean the Tube Ends
A square-ended tube should be free of plastic burrs, clean, and without square-ended ends. With a cloth, remove the dust from the ends.
Step 2: Mark the Tubes
You should mark the insertion or stop point of the push-fit connector on the PEX tubes if you are using a push-fit connector.
It may be possible for fittings from different brands to have different insertion depths. You should consult the pipe insertion depth chart provided by your brand. Ensure that both tubes are marked.
Step 3: Push the Tube Into One Side of the Elbow
One hand should hold the elbow; the other should have the tube. Incorporate the tube into the elbow. It is important to push in a single, firm motion.
Pulling the tube out by hand is impossible with push-fit connectors due to their internal barbs. There is a special tool you will need to use to remove the adhesive.
Step 4: Push the Tube Into the Other Side of the Elbow
Complete the joint by pushing the other PEX tube into the elbow on the opposite side.
Tips For Saving Money When Installing PEX Tubing
It is possible to save even more money if you follow a few tips when installing PEX tubing for your plumbing needs.
1. Consider The PEX Clamp Method
There are five major PEX clamp sizes (3/8″, 1/2″, 5/8″, 3/4″, and 1″) and stainless steel PEX cinch clamps you can use for the PEX clamp (cinch) method.
It is the most affordable tool on the market, requires little or no calibration, and works well for marking connections in tight areas.
2. Use Proper Type Fittings
Using lead-free PEX fittings when working on a heating project (no potable water), such as radiant floor heating, hydronic heating, radiators, and fan coils is not necessary.
Regular brass PEX fittings can be used instead. Plumbing and heating fittings made from Poly PEX are both low-lead compliant and potable water approved.
3. Use Ready-Made Manifolds Instead Of DIY
Compared to DIY manifolds, factory-made ones offer numerous advantages and, in most cases, cost less.
Radiant heat manifolds include features (flow monitoring, regulation, drainage, temperature monitoring, etc.) that you cannot find elsewhere, or which are more expensive when purchased separately.
Manifolds that have already been manufactured (whether copper or poly) are considerably cheaper than those built by hand.
4. Avoid “Sticks”
A stick is a straight piece of PEX pipe that is 10 or 20 feet long. There can be a lot of waste generated during the installation, and many more couplings are required than tubing in continuous rolls (100 ft, 300 ft, etc.), causing higher costs and higher leak risks.
Despite the stiffness of larger PEX sizes (such as 1″), they may be convenient for straight pipe runs but are more difficult to store and transport.
The use of sticks is common among plumbers who install rigid pipes. It is recommended to avoid PEX sticks unless you need to run a short straight pipe.
5. Use PEX Bend Supports Instead Of Elbows
You can make a 90-degree turn with PEX tubing without needing a fitting using bend support. Although these cannot provide sharp turns, they are suitable for most frame homes and protect the pipe from rigid/abrasive stud edges in a certain way.
Final Words
In conclusion, bending PEX tubing can be a crucial step in the installation process and help you navigate tight corners and spaces.
There are several different methods to bend PEX tubing, such as using a pipe-bending tool, heat gun, or even a simple pair of pliers.
Whichever method you choose, it’s important to take your time and make sure the bend is smooth and even, to avoid kinking or damaging the tubing.
Additionally, remember that to save money during installation, you need to plan ahead, buy bulk, and use a tubing cutter for clean and straight cuts.
With these tips and techniques, you’ll be able to bend PEX tubing like a pro and complete your plumbing project efficiently and cost-effectively.


