
Crown molding is a decorative feature that is commonly used to add a touch of elegance to a room.
It is typically installed at the point where the walls meet the ceiling, and it can help to create a seamless transition between the two surfaces.
However, over time, it is not uncommon for gaps or cracks to develop between the crown molding and the ceiling. These cracks can be unsightly and can even compromise the integrity of the molding itself.
In this article, we will provide some tips on how to fix cracks between crown molding and ceiling.

Why Is There A Gap Between Crown Molding And Ceiling?
There are several reasons why gaps can develop between crown molding and ceiling. One of the most common reasons is because of changes in temperature and humidity.
As the weather changes, wood expands and contracts, which can cause the crown molding to move slightly and create a gap. In addition, the weight of the crown molding itself can cause it to sag over time, which can also create a gap.
Finally, improper installation of the crown molding can lead to gaps developing between it and the ceiling. Whenever rough lumber behind drywall shrinks, it causes the crown molding ceiling gap.
You can prevent this by allowing the ceiling molding to float up and down on the wall rather than nailing it to the ceiling. During the winter, the humidity inside a home is lower, which can cause ceiling molding to pull away from the ceiling.
How Can I Fix Ceiling Molding Gaps?
If the ceiling molding gap is caused by a crack in the wall, you can fix it temporarily by caulking the crack. This should be done when the gap is at its largest, and the most expensive flexible caulk you can find should be used.
How to Caulk Cracks Between Molding & the Ceiling?
It is commonly used to seal cracks, gaps, and uneven molding edges in addition to keeping out water, insects, and cold drafts.
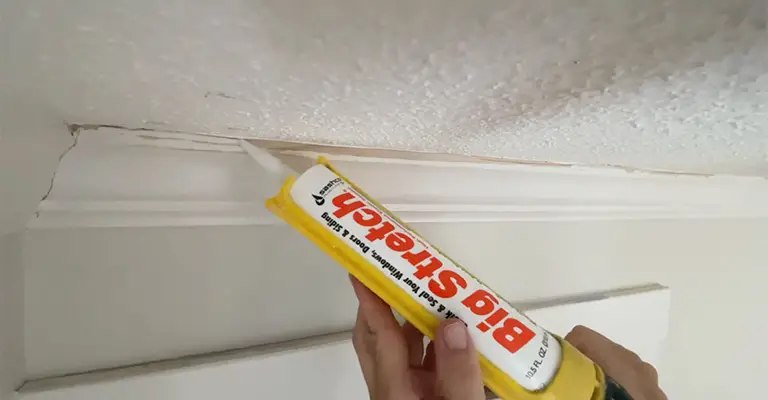
It is possible to hide cracks or gaps in crown molding by applying a thin bead of caulk between the crown molding and the ceiling.
If the caulk is painted to match the ceiling or molding, the gap at the ceiling between the crown molding and ceiling is not even noticeable.
Since bathrooms have higher humidity, caulk expands and contracts more easily between crown moldings and ceilings, causing cracks between crown moldings and ceilings.
It is recommended that you caulk cracks during the winter months, when there may be larger gaps than at other times of the year.
Things You Will Need
- Ladder
- Clean rags
- Caulk
- Scissors or knife
- Caulk gun
- Shallow bowl of water
1. Choosing The Right Caulk
When caulking crown molding seams, choose the right caulk. Caulk can be used on a variety of surfaces. Your goal is to find one that will adhere tightly to both the molding and the ceiling, as well as leave a smooth, seamless finish.
Most rooms will benefit from latex caulk labeled for interior use; however, bathrooms with a lot of moisture may benefit from silicone caulk.
2. Make Sure The Area To Be Caulked Is Clean
To ensure that the caulk adheres properly, wipe the top edge of the molding and ceiling with a damp rag to remove any dust or cobwebs. If grease or grime needs to be removed, use a mild detergent.
3. Make Sure The Caulk Tube Is Properly Cut

Caulk tube tips should be cut at a 45-degree angle. You will need to choose a spot on the tip that is about the same size as the space between the molding and the ceiling.
This is done so that the hole will be about the same size as the caulk bead that exits the tube. Make a small hole and then enlarge it if necessary. Start by drilling a hole about 1/8 inch deep.
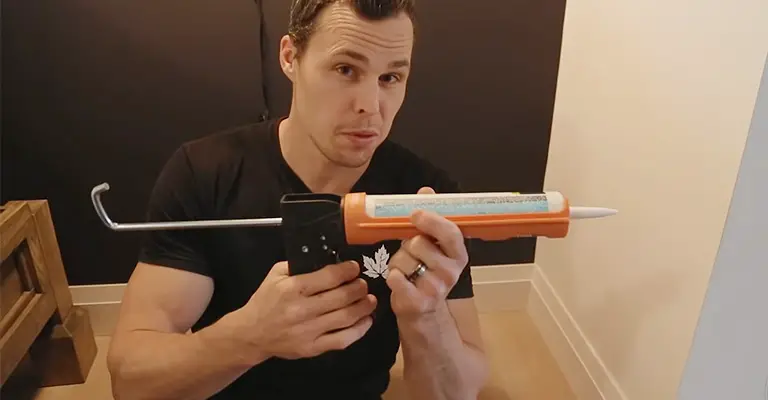
4. Insert Caulk Into Gun
Push the rod forward so that it rests on the bottom of the caulk tube, then pull back the rod on the caulk gun and slide the tube into it.
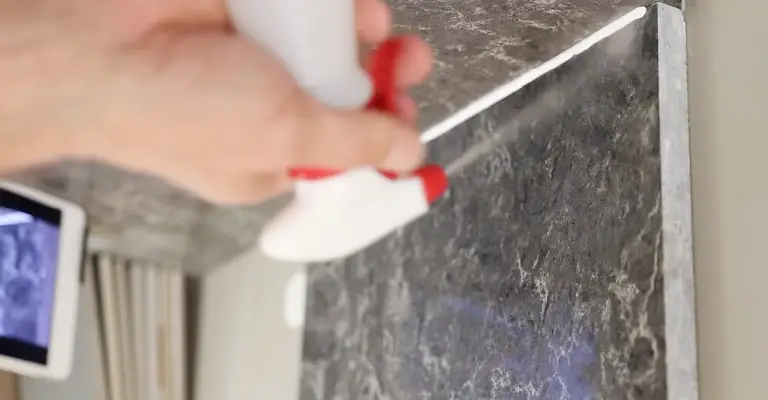
5. Apply Caulk in Sections
Working in sections, squeezing the trigger of the caulk gun, and holding steady pressure will allow you to apply caulk in a single bead along the top of the molding.
6. Smooth Caulk with Water
Using a finger dipped in water, smooth the bead of caulk along its length. Smooth the caulk immediately after application with water in a shallow bowl before a skin forms on its surface.
Does Rough Lumber Shrinkage Cause Crown Molding Gap?
Crown molding gaps are caused by rough lumber shrinkage. It is caused by the shrinkage of rough lumber behind the drywall that crown molding ceiling gaps occur. If the ceiling molding is not nailed to the ceiling, it can float up and down on the wall.
For example, the outside temperature and humidity in South Carolina vary greatly throughout the year. The air holds less humidity in the winter months because it cools down.
How Can Crown Molding Gap Be Prevented?
You can avoid the problem by attaching the ceiling studs to the crown molding rather than the wall studs. Crown molding would simply ride up and down the wall surface as the lumber expands and contracts with the seasons.
Rather than nailing a triangular block of rough lumber to ceiling joists on two walls and blocking on the other two, a simple triangular block of rough lumber could have been used to fill the void behind the crown molding.
In this case, the nails would be aimed upwards when nailing the crown molding to the wood. You can eliminate crown molding gaps at ceilings by attaching the molding this way. There should be no nails entering the wall studs or top plate.
Final Words
Whenever you work with a caulk gun for the first time, practice squeezing an even bead of caulk onto a scrap piece of wood or paper. You can stop the flow of the caulk after releasing the trigger by pressing the pressure release button.
You don’t need to paint the caulk line you create by using painter’s tape along the ceiling and molding edges.
As soon as the caulk starts to dry, smooth it down and remove the tape. Make sure you smooth the caulk before it starts to dry to avoid uneven results.


