
Are you tired of dealing with mold and mildew on your bathroom ceiling? A primer and sealer can be the solution you need.
These products provide a barrier that can help prevent moisture from penetrating the surface of your bathroom ceiling, reducing the risk of mold and mildew growth.
Not only that, but a properly primed and sealed bathroom ceiling can also improve the overall appearance of your bathroom. In this guide, we’ll walk you through the steps of how to use a primer and sealer for a bathroom ceiling.
Using A Primer & Sealer For A Bathroom Ceiling
The primer and sealer are dual-action paint that seals moisture from entering the bathroom, prevents stain bleeding through, and prevents mildew from growing.
In order to apply a combination of primer and sealer properly, the ceiling must be clean and free of mildew.
Topcoats of tinted latex or oil-based paint can be applied over most primers and sealers that are meant for interior or exterior use.
Materials Needed
To begin, you’ll need to gather the following materials:
- Primer specifically designed for bathrooms and ceilings
- Sealer specifically designed for bathrooms and ceilings
- Paint roller and tray
- Paint brushes
- Drop cloths or plastic sheeting
- Cleaning supplies, such as a degreaser and mildew remover
When choosing a primer and sealer, make sure they are specifically designed for use in bathrooms and on ceilings. These products will typically contain special mildew inhibitors that help prevent mold and mildew growth.
1. Preparing The Surface
The key to getting a good finish with a primer and sealer is to start with a clean surface. Begin by removing any existing paint or wallpaper from the bathroom ceiling. Next, clean the ceiling thoroughly with a degreaser and mildew remover.
Be sure to follow the manufacturer’s instructions for these products. Once the ceiling is clean and dry, use a paintbrush and roller to remove any dust or debris from the surface.
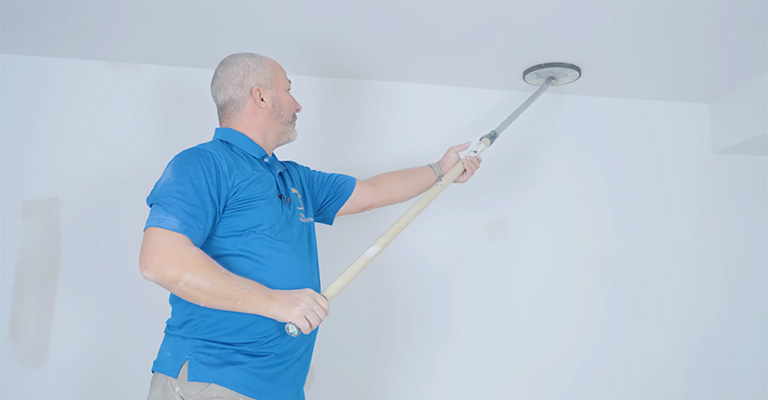
2. Applying The Primer
Once the surface is clean and dry, it’s time to apply the primer. Begin by pouring the primer into a paint tray.
Using a paint roller, apply the primer to the bathroom ceiling in a thin, even coat. Be sure to work in small sections and use a paintbrush to touch up any areas the roller may have missed.
3. Applying The Sealer
Once the primer is dry, it’s time to apply the sealer. Applying the sealer is an important step in the process of closing the gap between a brick wall and the ceiling.
It helps to protect the surface of the brick and ensure that the paint will adhere properly.
To apply the sealer, you will need:
- A paint roller or paint brush
- A sealer that is appropriate for use on brick surfaces (make sure to read the manufacturer’s instructions for proper application)
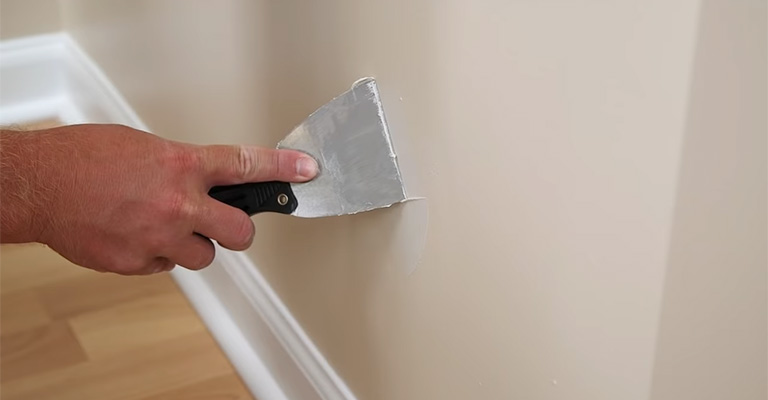
Step 1: Clean the surface of the brick. Use a wire brush or a mixture of warm water and mild detergent to remove any dirt or debris from the surface of the brick.
Step 2: Allow the brick to dry completely. Do not apply the sealer to a damp or wet surface.
Step 3: Apply the sealer to the surface of the brick. Use a paint roller or paint brush to apply the sealer in thin, even coats. Be sure to work in small sections and to overlap each pass slightly to ensure an even application.
Step 4: Allow the sealer to dry completely. The drying time will vary depending on the specific sealer you are using, so be sure to read the manufacturer’s instructions.
Step 5: Repeat steps 3 and 4 if necessary. Some sealers may require more than one coat for proper coverage.
Once the sealer is dry, you can proceed with painting the brick wall and ceiling. Remember to use the appropriate paint and paint brush or roller for the surface and be sure to test the color in a small area before you paint the whole wall.
4. Finishing Touches
Once the sealer is dry, you may need to do some touch-ups. Use a paint brush to touch up any areas that may have been missed or that may have dripped.
Be sure to let the sealer dry completely before using the bathroom again. This can take anywhere from a few hours to a few days, depending on the type of sealer you used.
Frequently Asked Questions
1. What is the purpose of a primer and sealer for a bathroom ceiling?
A primer and sealer are used to prepare and protect the surface of a bathroom ceiling before painting. The primer helps to create an even surface, while the sealer protects against moisture and mildew.
2. How do I choose the right primer and sealer for my bathroom ceiling?
When choosing a primer and sealer for your bathroom ceiling, it’s important to select products that are specifically designed for use in bathrooms.
These products will typically be labeled as mildew-resistant or moisture-resistant. It’s also a good idea to choose a product that is compatible with the paint you plan to use.
3. Can I use a regular primer and sealer, or do I need to use a special bathroom-specific product?
While regular primer and sealer can be used on a bathroom ceiling, it’s important to use products that are specifically designed for use in bathrooms.
These products will typically be labeled as mildew-resistant or moisture-resistant. They will also have a better performance in this humid environment.
4. How do I apply primer and sealer to my bathroom ceiling?
The process for applying primer and sealer to a bathroom ceiling is similar to the process for applying paint. First, make sure the ceiling is clean and dry.
Then, use a paint roller or brush to apply the primer and sealer in thin, even coats. Allow each coat to dry completely before applying the next one.
5. How long should I wait before painting my bathroom ceiling after applying primer and sealer?
It’s important to follow the manufacturer’s instructions for the specific primer and sealer you’re using.
Typically, you should wait at least 24 hours before painting your bathroom ceiling after applying primer and sealer. This will give the primer and sealer enough time to dry and cure.
Final Words
By using a primer and sealer for your bathroom ceiling, you can improve the overall appearance of your bathroom and reduce the risk of mold and mildew growth.
The process is relatively simple and can be completed in a weekend. By following the steps outlined in this guide, you’ll be able to achieve a polished, finished look for your bathroom ceiling.


