
Occasionally, a seemingly sensible idea isn’t legal, and that’s the case with wiring a ceiling fan to a cord so it can be plugged into an outlet.
While this approach would seem simple, you’ll have several issues with the electrical inspector if you take this route. Plug-in fans don’t have to be installed in electrical boxes, so if you really need one, get one designed for it.
You can get a sealed unit if you want to hang the fan from a hook attached to one of the ceiling joists or screw it into a light socket.
Depending on the type of fan housing, there is either an already attached cord or the cord plugs into a built-in terminal. To wire a ceiling fan to plug into a wall, you will need the following:
- A ceiling fan with a built-in outlet box
- A standard electrical wall outlet
- A ceiling fan wiring kit
- A ladder or step stool
Here are the steps to follow:
Turn off the power to the outlet at your circuit breaker or fuse box. This is to ensure your safety while working with electrical wiring.
- Remove the existing wall outlet cover and mounting bracket.
- Connect the ground wire from the ceiling fan to the green or bare copper wire from the wall outlet using a wire nut.
- Connect the white wire from the ceiling fan to the white wire from the wall outlet using a wire nut.
- Connect the black wire from the ceiling fan to the black wire from the wall outlet using a wire nut.
- Secure the wires with electrical tape or wire nuts, and tuck them into the outlet box.
- Install the ceiling fan outlet box and mounting bracket, following the manufacturer’s instructions.
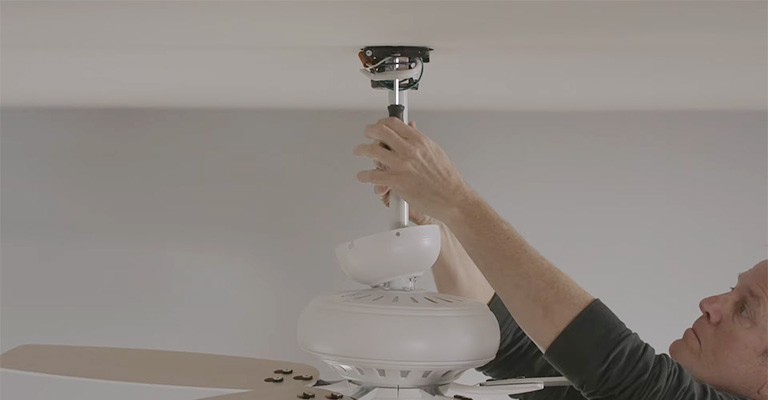
- Install the ceiling fan, following the manufacturer’s instructions.
- Turn the power back on at the circuit breaker or fuse box, and test the ceiling fan to ensure it works properly.
Following the manufacturer’s instructions and safety precautions when wiring a ceiling fan to a wall outlet is essential. If you are unsure about any part of the process, it is best to consult a professional electrician.
Problems With Cording an Existing Fan
Ceiling fans are traditionally mounted on electrical boxes that are braced to the ceiling joists to support their weight. A live circuit and switch wire connect to the fan wires in the box behind the wall or ceiling.
An extension cord could replace the circuit wire if you eliminate the switch, but that’s illegal because the cord would have to be wired to the fan wires inside the box.
Following the code, external cords cannot be wired inside electrical boxes. This is the first problem.
If you were to wire it to the fan, the cord would probably have to be run behind the ceiling until it can be fed through an opening. The second problem is that. Extension cords are illegal through a wall or ceiling and behind a wall or ceiling.
The third problem relates to the electrical code’s prohibition on using extension cords as substitutes for permanent wiring.
In some cases, you may be able to convince inspectors that the wiring isn’t permanent because you plug in the fan only when it is in use, but not all will.
Another thing. An electrical inspector typically prefers a ceiling fan to be connected to a working switch. Many people would probably not consider a plug-in cord a suitable alternative.
Buy a Plug-In Fan
With all the problems involved, you should avoid converting your existing ceiling fan to a plug-in. Getting an electrician to wire the fan correctly to a switch is the best way to keep the fan you have.
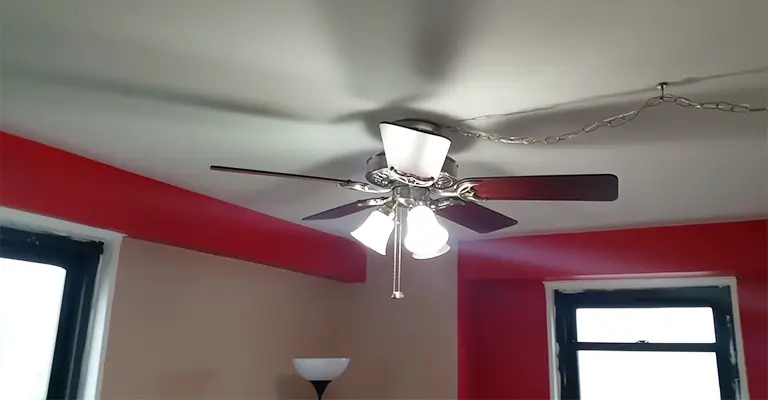
Choose from the many plug-in fans available at building supply stores and online if you really need one.
A big advantage of this fan type is that it is portable. Therefore, you can use the same fan in different parts of your house or even outside.
Forget About Using a Swag Kit
Hardware stores often carry swag kits that allow hardwired fixtures to convert into plug-ins. Fans and lights require much more power than the 16- or 18-gauge cords that come with these kits.
Unless you want to make your own Romex, which heats up when a fan loads it, you will have to use a 14 or 12-gauge wire. Connecting a plug to Romex is illegal.
A heavy-duty exterior extension cord will give you the same results as a swag kit, but it lacks the chain and attachments.
Alternative Method For Wiring a Ceiling Fan to Plug Into a Wall
If an electrical circuit box needs to be installed in the ceiling, installing a ceiling fan can be costly and complicated.
Plugging the fan into an existing, standard electrical outlet is easier if you use a swag kit.
Using internal wiring, you need to connect the swag cord to a ceiling fan. A DIY novice can handle it even if they have limited experience.
Additionally, since the fan isn’t permanently installed, you can move it anywhere you like. The following items are needed:
- Ladder
- Measuring tape
- Swag kit
- Screwdriver or drill
- Utility knife
- Wire nuts
- Swag hooks
Step 1:
To determine the vertical distance between the electrical outlet and the ceiling above the fan, measure the distance vertically. You will need to measure the distance from this wall to where you will install the fan on the ceiling.
Once you have added these two measurements, you will need to add 10 percent to account for loops in the swag chain. This figure represents the minimum length required for the chain and cord of the swag kit.
Step 2:
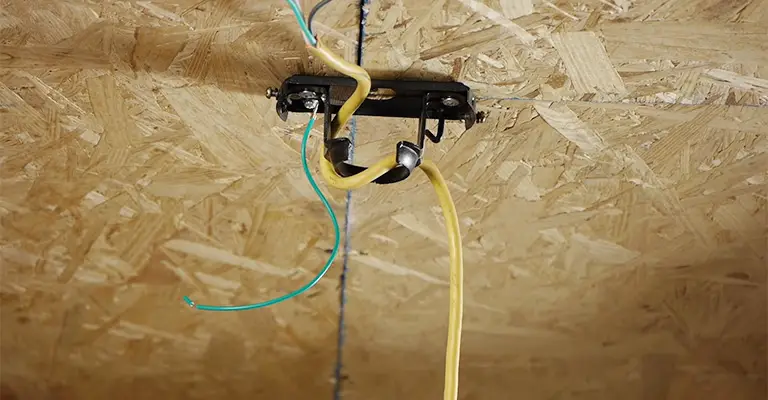
The mounting box for the fan needs to be mounted on the ceiling. Make sure its mounting screws are firmly secured in wood and not just in drywall by placing it directly under a joist.
Step 3:
In the ceiling, install the swag chain hooks. It is ideal to have at least two hooks leading from the fan to the outlet on the wall if the fan is in the middle of the room.
Make the swag chain and cord look pleasing by arranging them on the hooks in a pleasing symmetrical pattern. Avoid plugging the swag cord into the outlet. You’ll need to cut some excess cable and chain length for a proper reach.
Step 4:
A “J-hook” on the mounting box serves as a hanger for the motor base of the ceiling fan. You can work on wiring while your hands are free to secure the motor base.
Step 5:
Ensure the swag cord isn’t plugged in.
Step 6:
Utility knives are useful for peeling back about 5/8 inches of the thick outer insulation from the swag cord. Three wires will be inside the insulation of a three-prong male plug, one white, another black, and the third green.
You will only have the white and black wires inside the insulation if you have a 2-prong male plug.
Step 7:
Take the wires apart and remove about a third of an inch of insulation from each end.
Step 8:
Leave the swag cord hanging down the center of the mounting box after running it through the side. The mounting box should have about six to eight inches of swag cord.
Step 9:
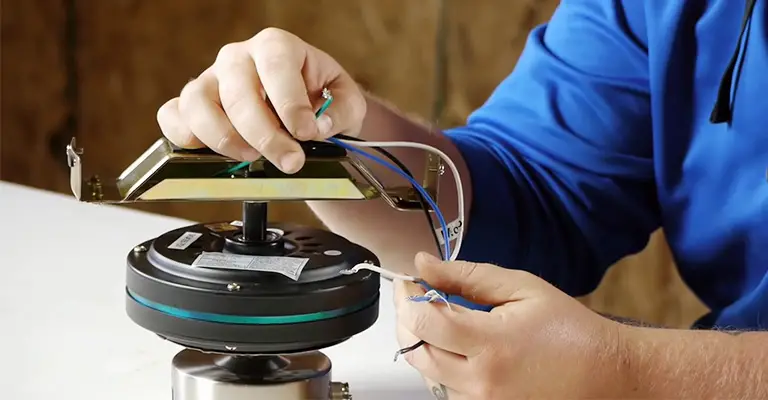
Inside the motor base, examine the wiring. It should have three wires: a white, a black, and a green. If the wires have been stripped of their insulation, strip them to match the swag cord’s wires if they haven’t already been stripped.
Step 10:
In accordance with Bob Vila‘s directions, splice the wires. The white motor wire and the white swag wire must be held side by side so their exposed copper ends touch.
The wire nuts should fit snugly over the two wires and bind them together when you twist them from left to right. Be gentle when tugging on the white wires to ensure they won’t come loose.
You should repeat this process for the black and green wires as well. For safety, attach a wire nut to the green motor wire and tuck it inside the mounting box if there is no green swag wire.
Step 11:
Put the wire nuts and extra cable up into the mounting box, making sure they are pointed upward. Complete the fan assembly by attaching the fan motor to the ceiling mount according to the manufacturer’s instructions.
Step 12:
Ensure that the chain and cord do not dangle in the fan blades’ path by adjusting the swag’s first loop from the motor to the hook.
Step 13:
Using the rocker switch on the swag cord, turn on the fan by plugging the swag cord into an outlet. Using its hanging chain, you can adjust the fan’s speed from low to high.
Final Tips
Even if nothing is plugged in, you should turn off the main circuit box when working on an electrical project. If you are not experienced with creating solid connections, practice securing wires together with wire nuts.


