
There are three terminals on a single pole switch. The ground is one, and line and load are the other two.
Three-way switches are those with an additional terminal. A terminal can accept two wires if it is designed in such a way.
As a result, it is likely that the feed is coming in from one device and then going out to another.
Also, it is possible that two separate light circuits are being switched by that switch.
What Is A Single-Pole Light Switch?
When you flip the toggle or paddle of a standard single-pole light switch up or down, you turn on or off the lights. This familiar switch is known as a “single-pole light switch among hardware dealers and electricians.
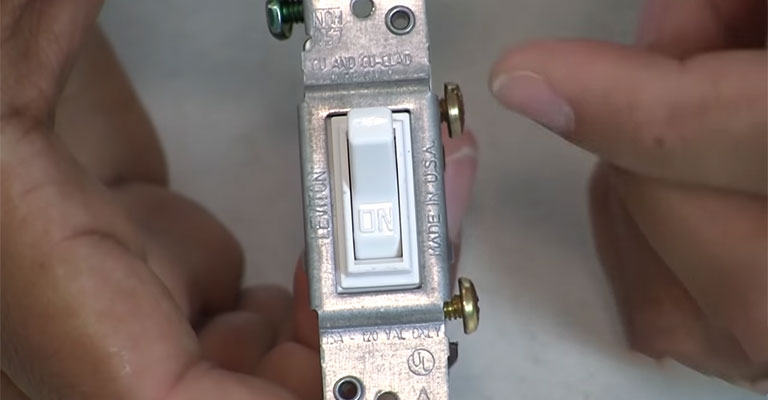
The electrical circuit’s black (“hot”) wires are connected to the side terminal screws of a single-pole switch.
So, it’s one black wire coming from the power source (the electrical panel) and one or more black wires going to the light fixtures.
Electrical current flows through the switch when it’s on from the inbound wire to the outbound wire. Likewise, switches interrupt electricity flow when they’re turned off.
Imagine it as a drawbridge that cars can cross when in position but disrupts traffic when open.
Therefore, green grounding screws are on most switches for safe “grounding” to the circuit ground wire.
How To Wire A Standard Light Switch?
With a standard single-pole switch, one light fixture is controlled by one switch: on/off. However, there is a bit more complexity involved in 3-way switch wiring, where there are two switches and one light.
This type of circuit makes sense once you understand how electricity moves. It is almost always better to hire an electrician to install new electrical wiring.
However, homeowners can also successfully replace old switches with new switches, depending on local codes.
Three-way switches are simple to replace but more complicated than single-pole switches. You should have a basic understanding of switch wiring if you are considering such a replacement.
An electrician can replace a switch if you aren’t comfortable doing it. When doing any wiring, safety should always be the top priority.
You should always turn off the electricity at the breaker box before doing anything else and test the wires in switch boxes with a voltage tester to ensure they’re not hot.
Three-Way Switch Wiring Guide
The replacement of a 3-way switch shouldn’t be difficult if you have replacement experience with single-pole switches.
A wire is added to the box as the most significant difference. Two switches are connected by an extra wire called a “traveler.”
Wires are usually routed from one switch to the light and then to the second switch when wiring a 3-way switch.
However, the following steps on how to wire a 3-way switch can be followed regardless of whether or not your switch is wired this way.
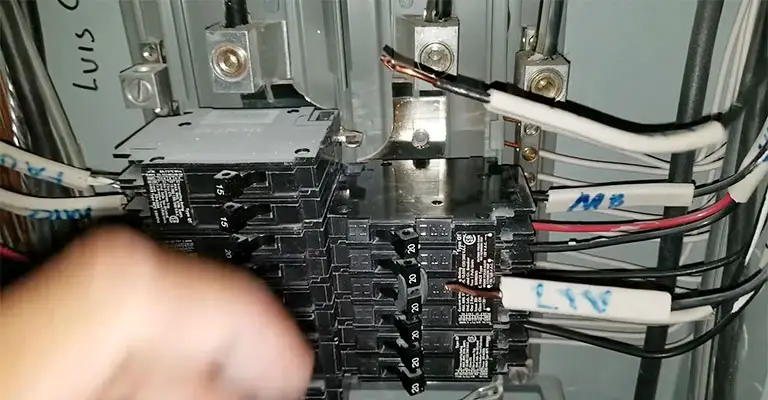
Step 1: Disconnect The Service Panel From The Power Source
In your home, locate the breaker panel. The location of the 3-way switch should be indicated on the label next to the breaker. Then, turn off the breaker switch. Make sure the switch is off before moving on to the next step.
Step 2: Remove The Old Switch
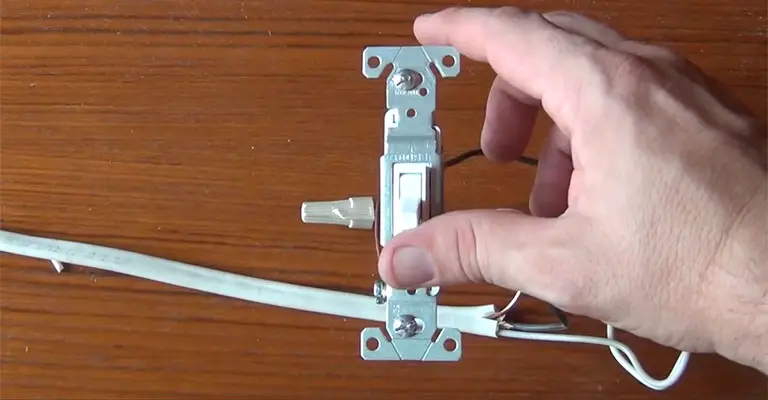
By removing the two screws on the switch plate, you can see the old switch beneath it. Next, disconnect the switch by unscrewing the fasteners.
When pulling out the switch with the wires still attached, there should be enough given on the wires for you to pull it out gently.
Step 3: Identify Each Type Of Wire By Looking At It
It is possible for the switch to have two different types of wires depending on how it was wired.
Typically, 14/2 cables have two white wires, one black wire, and one ground wire. Cables with four wires (black, white, red, and ground) are considered 14/3 cables.
Step 4: Locate And Label The Common Wire
The box should contain eight wires. A black and a red wire are connected to a copper or black screw terminal, and a black wire is connected to a white neutral wire with a wire nut.
There are also three round wires connected with a wire nut. Black wires are known as common wires.
If you want to remember which wire is the common one later, tape a piece of electrical tape on it before disconnecting it.
Step 5: Locate Those Wires In The Second Switch Box
The second switch box should have only four wires: one white, one red, one black, and one ground. Identifying the white wire as a hot wire may be marked with black paint or electrical tape.
There is only one common wire in the box, the black wire that runs to the common terminal. To identify the common wire later, it’s helpful to label it now.
Step 6: Disconnect The Wires By Twisting Off The Wire Nuts
Disconnect the wires after you are sure you understand what each one does and that they are clearly labeled.
Once the nuts are loosened, remove the terminal screws, and expose the wires’ bare ends, so they are no longer connected to the switch.
Step 7: Wire Up And Install The New Switches

It is essential to ensure that the new switches are identical before you install them. In addition, the same switch should be installed in both locations since wire configurations vary between brands.
On the new switches, identify the common wires and common terminals with labels or colors.
For example, the switch’s lower area should have a black or copper terminal. After that, connect the common terminals to the common wires.
After that, we need to connect the red traveler wire to each switch. Switches are wired with red wires at their tops. If you are connecting it to both boxes, ensure that it is connected to the same side.
Each box has a second traveler wire, which needs to be connected. A black wire travels from box to box that isn’t labeled as a common wire, and a white wire travels from box to box that is coated with black paint or tape.
Use the red wire’s open upper terminals to connect these wires. Using a wire nut, you will twist and secure the three neutral wires in the first box to the white neutral wires.
Next, connect the green terminal of the switch to the end of the shortest ground wire.
Finally, to ground the switch, connect it to the green terminal screw or brass terminal screw on the second box. You should now be able to connect all of the wires.
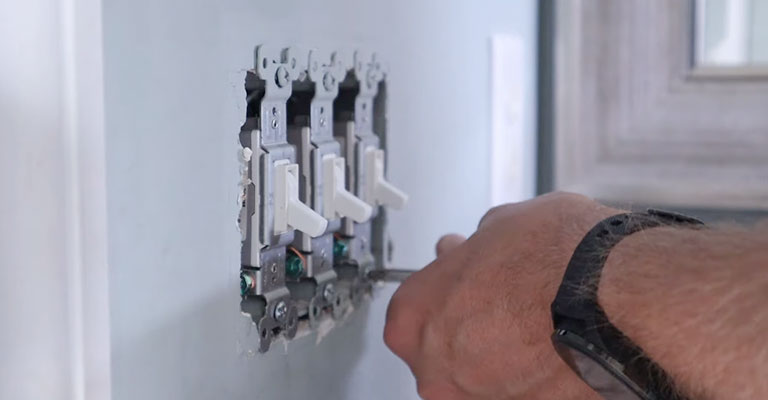
Step 8: Plug In Power, Install The Switch Covers, And Check The Switches
Two screws should be used to secure the switches back into the box after all of the wires have been secured. In the next step, you will need to reinstall the switch plates.
Finally, switch back on the breaker for the switches at the breaker panel. You can test the switches by turning them on and off.
Single Pole Conversion of Three-Way Switches
Adding a single pole to a 3-way switch requires removing a traveler wire. Therefore, connecting the wires to the common and one of the traveler terminals is necessary for a 3-way switch to function as a single pole.
There will be no power if the wires are connected to two terminals on the traveler. There is no connection to the other traveler terminal.
Alternate 3-Way Switch Wiring Configurations
A 3-way switch can be wired in various ways, not just the configuration described above.
The configuration is determined when power enters a circuit (either at a switch or at a light fixture). An electrician should be the only one who performs alternative wiring configurations.
Final Words
Wiring a switch is pretty simple when you replace existing switches with new ones. The installation of new switches, however, requires the expertise of a licensed electrician.
DIYers should have at least some knowledge and experience in connecting light switch wires, and safety should always be the priority. Make sure the power has been turned off before removing a switch.
At first glance, three-way switches seem more complicated, but they’re actually the same as single-pole switches in that the wires are arranged the same way.
In addition, the process of wiring a 3-way switch is simplified when the common wires are labeled.


