
One of the most important skills woodworking novices need to master is how to connect boards at clean, crisp, and strong 90-degree angles.
Fortunately, there are several ways to go about it. When it comes to board joining, there really isn’t one way that works best.
There are various methods you can use depending on the tools you have available, the budget, the number of joints you need, whether the project needs to be high-end, and the technique you find most enjoyable at the time.
How To Join Two Pieces Of Wood At 90 Degrees?
Screwing from one board’s outside face into the other board’s connecting end is the easiest way to make 90-degree joints. To avoid splitting the boards, you should pre-drill the holes before using screws.
Countersink the screw head holes so that they sit below the surface of the wood if you choose this approach.
In this way, you will be able to conceal the screw heads and prevent the board from being split by the hardware when you drive it all the way in.
In addition to preventing accidents, countersinking can also keep your shirt from catching on one of the screws while you’re working.
Wood putty can be used to hide screws, or a countersink hole can be drilled that will allow a dowel to hide the screw head.
Your dowels can also be a design opportunity if you choose contrasting wood to add a visual accent to the piece.
Drawbacks
In squared joints, the pressure is concentrated around the screws, which is one of the drawbacks of only using screws.
Especially if they’re thin, those particular places are more likely to break or crack. As the joint flexes with use and the wood expands and contracts naturally over time, screws can loosen as well.
It may be helpful to apply a bead of glue along the edge of one of the boards to strengthen the joint. The screws serve as clamps until the adhesive dries, while the glue acts as the main hold.
Steps To Join 2 Pieces Of Wood At 90 Degrees
You must follow certain steps when joining wood pieces together to ensure that you get the perfect angle and a clean finish. Using the miter joint method, we will join two pieces of wood at a right angle.
You May Need The Following Tools
You will need some equipment to accomplish this task before we move on to the steps. This process requires the following tools:
- A miter saw
- Nails or screws
- Miter box
- Wood glue
- Hammer or screwdriver
- One-handed bar clamps
- Corner clamps
- Utility knife
Step 1 – Take Measurements
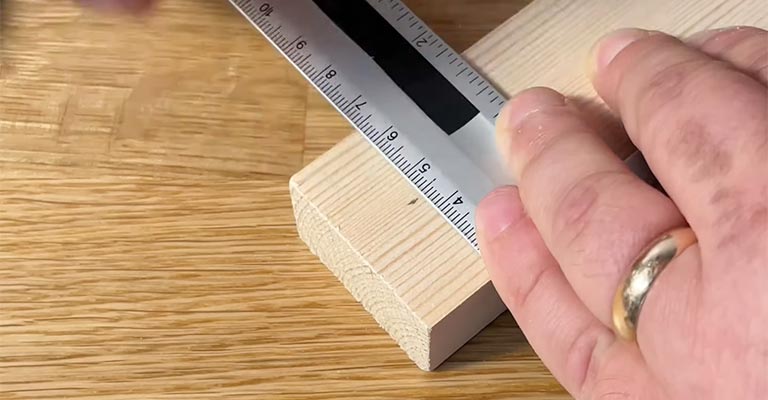
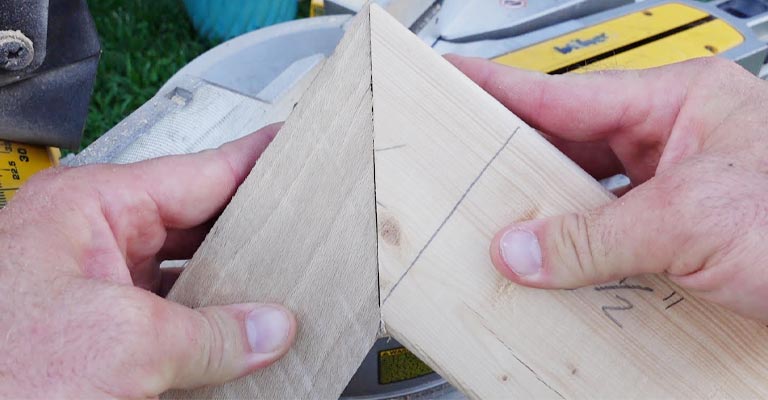
It is important that you arrange the ends of your two pieces of wood so that they are opposite each other. Using a utility knife, mark the 45-degree angle on each end of the wood.
Step 2 – Make Sure The Wood Is Cut On Both Ends
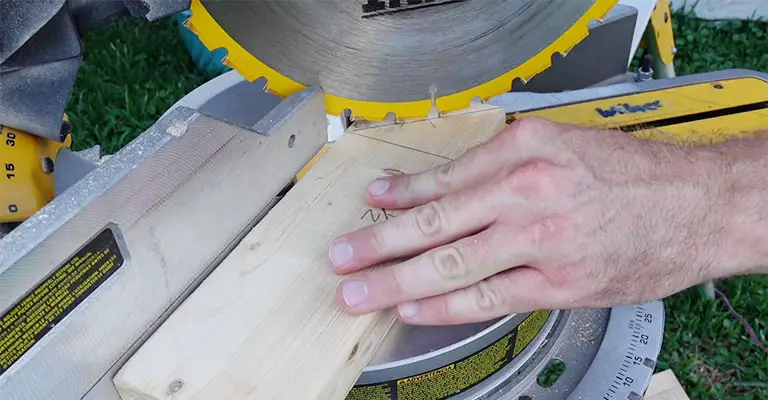
Both pieces of wood will need to be cut on a straight 45-degree angle.
With one piece of wood from upper right to lower left, and the other piece of wood from upper left to lower right, measure and mark both ends at a 45-degree angle, and cut them with a miter saw.
Miter saws are preferable to ordinary saws because they do not leave gaps and cut accurately. By doing this, joints will be perfectly fitting and there won’t be any gaps or end grains to cause problems.
Step 3 – Fit The Joints Together
After cutting the two pieces of wood, glue both cuts together after you have completed your cuts.
You will be able to fill any gaps on the cut surfaces due to the glue, helping to ensure the strength of the joint. The wood pieces will also be held together by it.
Step 4 – Clamp The Pieces Together

When you have glued the wood pieces together, use a clamp to hold them tightly against each other until the glue dries.
During this stage, you should ensure the angles fit perfectly, and you can confirm the angle before you screw or nail the pieces together.
Step 5 – Fasten The Pieces
In this type of joinery, this is the last step. Nails or screws can be used for fastening. It depends on the purpose of the joint and the strength that you need to decide whether to use screws or nails.
The screw has a higher tensile strength than nails but is less flexible than nails as compared to screws. Nails, however, are less brittle, which means they provide better shear strength than screws.
Dados Create Mechanical Support Between Boards
It is fine to use screws and glue to join wood, but if you want more stability and durability, you can place one board inside another. Dice come into play here.
Dado joints consist of channels cut into one board of the same width as the connecting board, which allows them to fit tightly together.
Furthermore, dice provide more surface area for glue to adhere to, as they cover three sides of the channel rather than just the edges. The wood will be less likely to crack as a result of stronger adhesive.
A dado stack on your table saw can be used to make one of these joints. A straight-cut router bit and a straightedge can be used if you don’t have one of those. You can also take multiple passes with a single blade.
Easy-To-Hide Joints Can Be Made With Pocket Hole Screws
Using pocket hole screws will prevent you from seeing any screws or patched holes. Drilling faster and more accurately will be possible with this method, which requires a pocket hole jig.
One board should have long, angled holes pointing toward its edge. Use the jig to drill these holes. As a result, these holes allow screws to emerge from one board and drive into another at an angle.
By placing these holes inside, underneath, or behind the finished piece, you may be able to hide them from view.
To fill holes that have to be drilled on a visible part of your project or to achieve a polished no-hole look, you can use pre-cut or standard dowels.
You should do your best to keep these plugs hidden as much as you can, since most of the time they will still be somewhat visible.
As with the previous technique on this list, pocket hole screws suffer the same limitation-the breaking force is concentrated in a small area.
In the long run, pocket-screwed boards will benefit from a line of glue, as mentioned above.
A piece of furniture I built over ten years ago is still as solid as the day I made it with pocket hole screws and glue.
Common Methods for Joining Wood
Joints are required for most wood projects, whether they are tables, birdhouses, or simple boxes. To help you get the perfect joint for your project, we’ll show you some types of joints and how to use jigs and tools.
Butt Joint
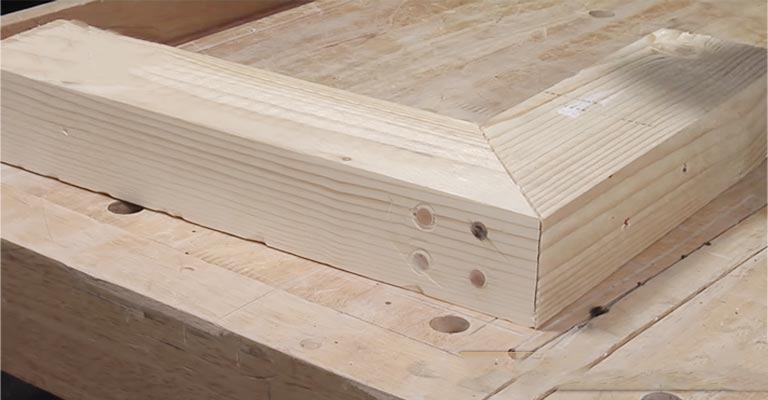
A butt joint is the easiest and most common type of joint. Make a 90-degree joint by placing the ends of the two pieces of wood against each other and screwing them together.
You can also use dowels instead of screws. The joint is weak, so if you are looking for something a bit more sturdy, you may want to use one of the next methods.
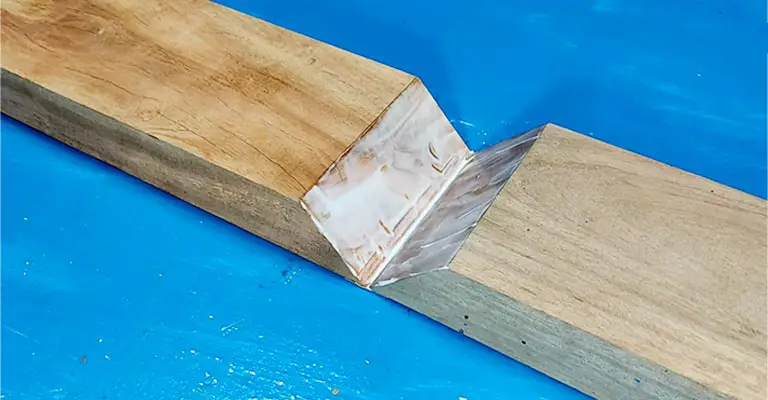
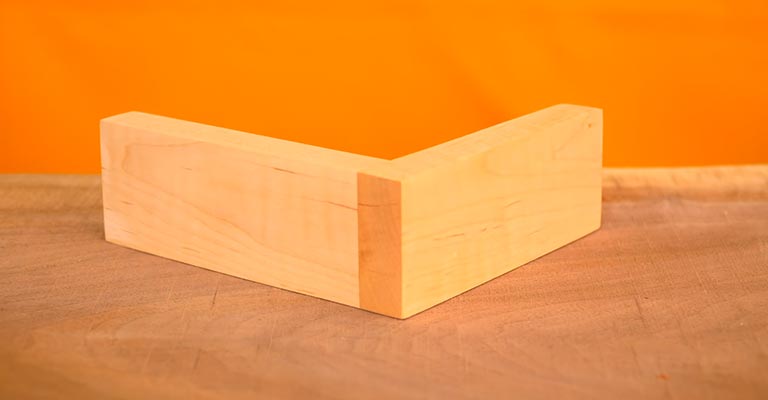
Mitre Joint
The miter joint is an easy way to join two pieces of wood at 90 degrees. To join the woods, you must cut both ends at 45 degrees on opposite sides. Then you fit them together, glue them, and screw or nail them together.
The mitre joints are made by cutting the wood at opposing 45-degree angles and joining it together so that there is no end grain visible. Strength-wise, it is similar to a standard butt joint.
Pocket Joint
In addition to hiding screw holes, pocket joints can create a clean, seamless appearance. To make things easier, a pocket hole jig helps by providing a consistent depth and angle.
To make these joints, you have to drill diagonally through the side of one piece into the side of the next, joining them from below.
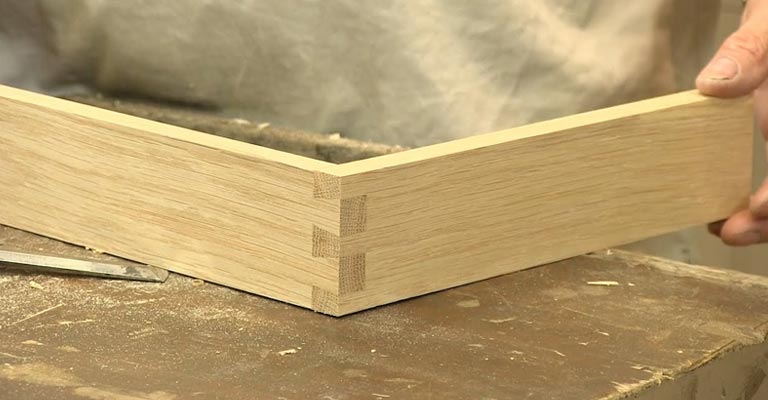
Box Joint
An alternating pattern of notches is carved away from the wood pieces in the box joint, allowing the pieces to slide together seamlessly. To get the perfect width and consistency, you can hand cut them or use a dado stack.
Dowel Joint
If you don’t want to drill or use glue, dowel joints are a good option. A dowel hole is cut into each end of the wood and a cylindrical dowel is inserted into each hole to hold the wood together.
Biscuit Joint
If you are making a tabletops, cabinets, or other flat-surface project, biscuit joints are great for joining multiple pieces of wood together.
Using a biscuit joiner, you’ll cut shapes of half-biscuits into the wood and then put them together with a wooden circle called a biscuit.
Dovetail Joint
Dovetail joints are not only beautiful but also strong, making them one of the best joints to make.
Dovetail jigs are used for cutting out the sections so that they slide together with no wiggle room. Once the piece is complete, they are also visible, creating a lovely aesthetic.
Dado Joint
Dado joints are made when one piece of wood is cut to match the size of the adjoining piece. A strong joint is then created by screwing or gluing the pieces together.
If you don’t have a dado stack on your table saw, you can still use a regular table saw blade for making small cuts close together, then chiseling them out to create the cutout.
Corner Bridle Joint
Combining a mortise and tenon joint with a tongue and groove joint, a corner bridle joint is similar to a mortise and tenon joint.
Use a dado blade and set the height of the cut according to the stock’s width on a table saw. A centered groove should be cut into one piece, and then the connecting piece should be trimmed to fit within it.
Rabbet Joint
A rebated joint, also called a rabbet joint, is the same as a dado joint, except that the cut is in the board’s edge. When fastened with a screw or some wood glue, the L-shaped notch accommodates another board, creating a flush look.
Half-Lap Joint
Half-lap joints allow two boards with the same dimensions to be joined without adding any height by cutting away the same thickness from both. In addition, it can be used to extend the length of two boards by splicing them together.
Mortise and Tenon Joint
Mortise and tenon joints are one of the most classic and elegant ways to join wood.
Pegs, or tenons, are cut into the ends of one board to slide snugly into the holes, or mortises, on the adjoining board. Glue can be used to strengthen this further.
Tongue and Groove Joint
Most tongue and groove joints are found in flooring and siding. It is common practice to cut boards so that a small protrusion extends across the entire width from the middle (the tongue).
To create a tight fit, the middle of the connecting board has been hollowed out (the groove).
Summary
It’s hard for me not to like pocket hole screws. For about $20, you can get a drill, guides, and square-bit screwdriver. In just a few seconds, it makes a pretty strong joint.
It is possible to buy ore-cut plugs and even tools to make your own plugs to glue into pocket holes if the size is exposed.
To keep the spacing correct, wood dowels can be used and holes should be drilled using a dowel guide tool. If you cut your own dowels, you’ll get a cheaper price than buying premade dowels with glue spirals.
It costs approximately $60 from Harbor Freight, but you can get the tool for less with a coupon. Glue, biscuits, a mallet and a biscuit plate joiner tool are required for a glued biscuit joint.
A mallet is used to drive the pieces together over the biscuit and they will usually stay together without clamping, but the glue has to cure first. In terms of difficulty, a spline joint is similar to a tenon-tenon joint.
Last but not least we have the lap joint, which can be cut by handsaw and chisel, but is best cut by a table saw. Compared to mortise and tenon joints, it is easier.
It is possible to join pieces with special fasteners, joining plates, flat ells, and bent ells however they are not the most attractive.


