
If you are building a new home or remodeling your bathroom, you may need to rough the toilet plumbing into a concrete slab. This can be a daunting task for those unfamiliar with plumbing or working with concrete.
However, with the right tools, materials, and guidance, it is possible to successfully rough toilet plumbing in a concrete slab.
The process involves:
- Cutting through the concrete slab.
- Installing the drain and waste lines.
- Connecting them to the main sewer or septic system.
In this article, we will provide a step-by-step guide on rough toilet plumbing in a concrete slab. We will cover the tools and materials required, the preparation process, and the installation process.
By the end of this article, you will have the knowledge and confidence to tackle this challenging task and ensure that your bathroom’s plumbing is installed correctly and functioning properly.
Understanding Rough In Plumbing
During the rough-in plumbing phase, all the water and drain pipes are installed into the holes in the studs and the vent system.
In addition, all pipe connections have been made, sometimes through the foundation, but no sinks, fixtures, or facets have been installed.
Prior to insulating and sheet rocking for the framing and pouring concrete for slabs on grade, we need to get the basic framework in place.
How To Rough In Toilet Plumbing In Concrete Slab?
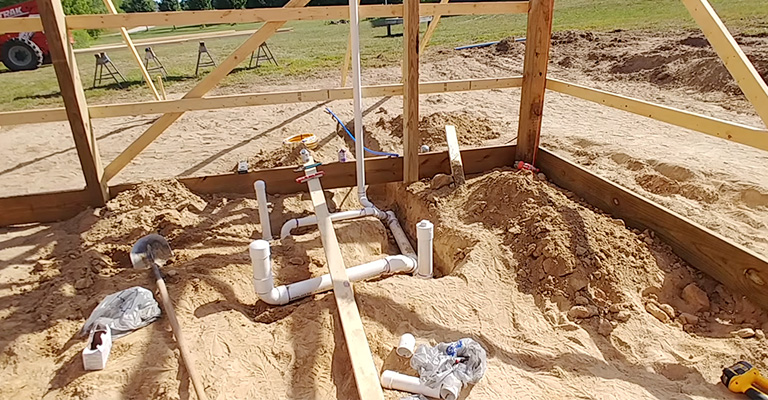
After the vent system has been installed and all the water and drainage pipes have been installed through the stud-hole openings, rough plumbing has been completed.
In addition, each pipe connection has been completed, sometimes through the foundation, but no sinks, facets, or other fixtures have been added yet.
The framework needs to be put in place, followed by insulation, sheetrock, and concrete pouring if it is a slab-on-grade building.
Generally, plumbing drains and pipes are installed before the foundation concrete for a building is poured.
Thus, the majority of connections in plumbing are located within the foundation. You will need to cut through the concrete foundation to replace and fix a damaged toilet drain or install a new one.
Considerations Before Starting Rough In Toilet Plumbing
To become a skilled plumber, you should thoroughly understand all aspects of home construction. To know what can be cut or drilled without compromising the framework, you should understand how wood is framed.
It is essential to read electrical drawings to avoid placing pipes in the path of fixtures or ceiling lights. Understanding how mechanical designs work is important to avoid stepping on ductwork.
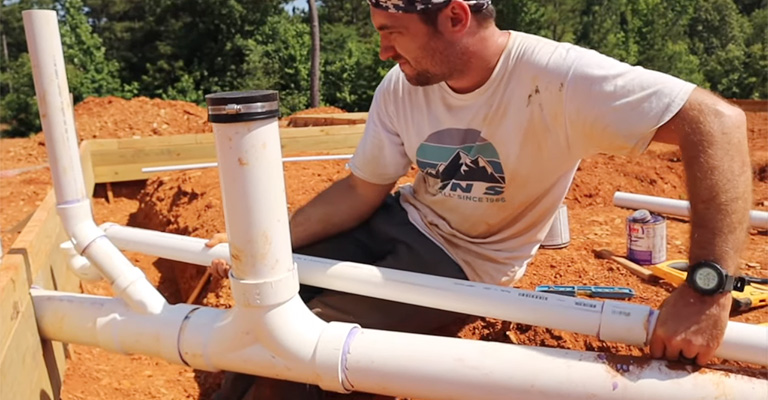
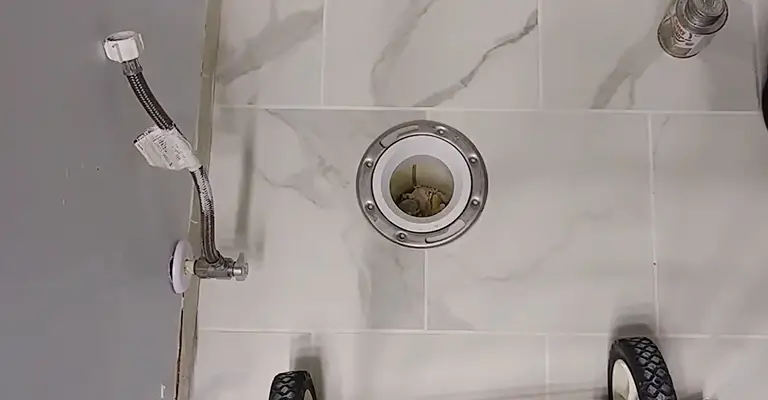
A toilet requires either a 3 or 4″ drain pipe. If you use a 4″, you can pour the concrete right up to the pipe since you can use an internal fitting flange. If you use 3″, you should put the flange on the outside (an option with 4″).
Since it needs to fit around the pipe, you need to put a removable sleeve around the pipe so you can install the flange later. In the USA, most toilets are roughed in at 12″.
That means that the center of the drain from the FINISHED wall is 12″. Better to be a little bigger than smaller since when you go with the normally available alternatives, you end up with 10 or 14″.
You need a vent line for each device (sink and toilet). The drain for the sink is usually in the wall behind the sink. A sink drain line is often 1.5″, but there is often a minimum size (2″?) if it is going to be under concrete.
When installing drains, be sure to use the right fittings so they can be snaked if needed. Also, maintain a 1/4″ per foot drop.
A combination of vent lines can be inserted above the flood plain of the sink (normally 42″) and then carried through the roof.
Do not try to get the toilet flange at just the right height. Let it hang a little bit longer and cut it off when you finish your floor. In most cases, the flange should be installed over a finished floor.
Steps To Install A Toilet Flange In Concrete Slab
Replacing a toilet is one of the simplest and seemingly complex bathroom projects. The process of replacing an old toilet can be done in less than an hour by even inexperienced plumbers.
It’s common for the old toilet’s flange to be incompatible with the new toilet when changing a toilet. Having been exposed to water and stress for so long, it can be rusty, broken in half, or just too filthy.
1. Cut And Remove Old Flange
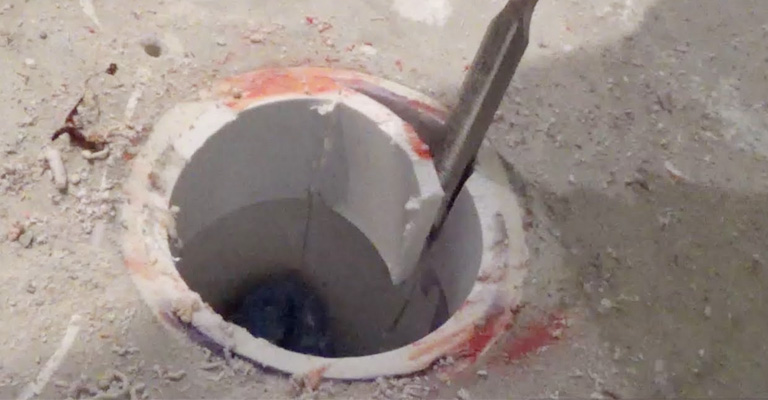
Removing the toilet will probably uncover an existing toilet flange. It is necessary to remove the old flange and any obstructions before installing the new one.
Concrete slabs will be fastened via bolts within the slabs burying the old flange. When the old bolts are in good condition and align with the new flange, you can use them to secure the new flange.
Angle grinders or multi-tools with a metal-cutting blade can be used to remove bolts and other sticking objects. Each piece of wood must be cut down flush with the concrete.
2. Remove Old Wax Ring
When you remove the blockages, the old wax ring around the drain opening will remain. The wax will likely be thick and gooey, as well as tainted with sewage.
Getting rid of wax rings requires persistence, a putty knife, and latex gloves. The old wax ring should be disposed of the piece by piece in a garbage bag.
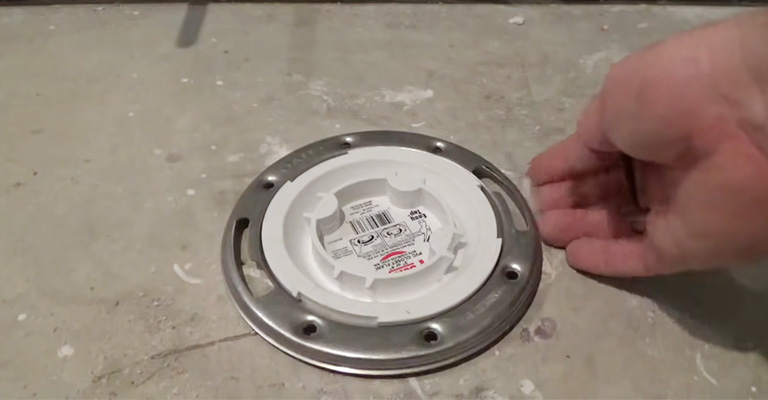
3. Purchase A New Flange

Remember to measure the diameter of your new flange against the drain pipe that has just been exposed. Take a measure of the diameter or bring the original flange with you to the store if you wish to buy a replacement flange.
4. Install A New Flange With T-Bolts
As soon as the T-bolts are installed into the new toilet flange, their threaded shafts should be standing up.
After the bolts have been set, you can imagine where the toilet will go. Make sure the toilet flange is pressed into the drain aperture by using the two T-bolts as guides.
You should ensure that the two bolts on the back wall are spaced equally in order to ensure the tank is parallel to the wall. The flange can be rotated either way until the desired position is reached.
Although there will be some movement once the toilet is in place, it is always better to get the position as straight as possible before fastening the flange. Be sure that there are no gaps or loose fittings around the flange.
5. Firm The Flange On The Concrete
Use Tapcon anchors or masonry or concrete screws to secure the toilet flange to the concrete slab. When using a plastic flange ring, make sure not to overtighten the anchors.
Now that the toilet flange has been installed, you can replace the wax ring on the toilet. A messy task such as removing the old toilet flange may make it difficult for even the most patient DIYers.
Drilling into concrete and installing fasteners are two specialty sub-projects that are unfamiliar to DIYers. Whatever the situation, it would be wise to seek the assistance of a trained, licensed plumber.
6. Seal The Concrete
Fresh concrete must be applied after the cut foundation is sealed with the new toilet drain. Make sure your structural engineer checks that the cement mixture holds the same strength as the original concrete slab.
The only way to fix plumbing that malfunctions are to cut the concrete. It is best to install toilets or other bathroom improvements so that the drain line is run outside the foundation and is connected to the yard’s main drain.
Conclusion
Even with a step-by-step guide, this plumbing work may seem challenging and require a high level of competency. As a result of this and the fact that you are present inside a partially finished building, safety is a concern for you.
When a smaller plumbing installation is only a stepping stone for rough-in plumbing, hiring a professional may benefit you in many cases.


