
Ensuring electrical safety in our homes and workplaces is of paramount importance, and Ground Fault Circuit Interrupter (GFCI) breakers play a crucial role in this regard.
These ingenious devices are designed to protect us from electrical shocks and fires by instantly cutting off power when they detect abnormal electrical currents.
However, like any other electrical component, GFCI breakers can deteriorate or malfunction over time, potentially compromising their protective capabilities.
In this guide, we will explore how to tell if a GFCI breaker is bad, helping you maintain a safe and secure electrical system in your environment.
How Do I Test A GFCI Breaker?
There are those outlets with the test and reset buttons that are called GFCI outlets (ground fault circuit interrupters). Areas of the house with the greatest shock hazards require them.
The GFCI protects against deadly electrical shocks by tripping immediately if an electrical leak is detected.
Tripped GFCIs are often overlooked as the source of dead outlets. This is due to the fact that electricians often save money by connecting additional standard outlets to one GFCI outlet in areas where GFCI outlets are required.
When you press the “test” button, the GFCI may not reset or the button may not pop out, indicating that the GFCI does not have power or is defective.
It may be that there is a dangerous current leak somewhere on the circuit if the “reset” button trips repeatedly. It is necessary to conduct additional electrical testing in either case in order to solve the problem.
You should probably call an electrician for assistance.
How to Tell If a GFCI Breaker is Bad All by Yourself

You can determine a bad GFCI outlet using the information provided below. If your GFCI doesn’t trip anymore whenever a ground fault occurs, follow this step-by-step procedure to take immediate action.
What You Will Need
The following tools should be acquired before we move on to the troubleshooting techniques. For electric matters, you need some kind of safety equipment and technology to test a GFCI breaker.
Voltage Tester
Using this tool, you can detect electricity flowing through an outlet or identify the GFCI’s responsible breaker. A non-contact voltage tester is safer because no live wires need to be touched.
You can quickly determine if your GFCI breaker is in good working condition with this pen-like equipment. The device emits a beeping sound or lights up when it comes into contact with a live outlet receptacle or wire.
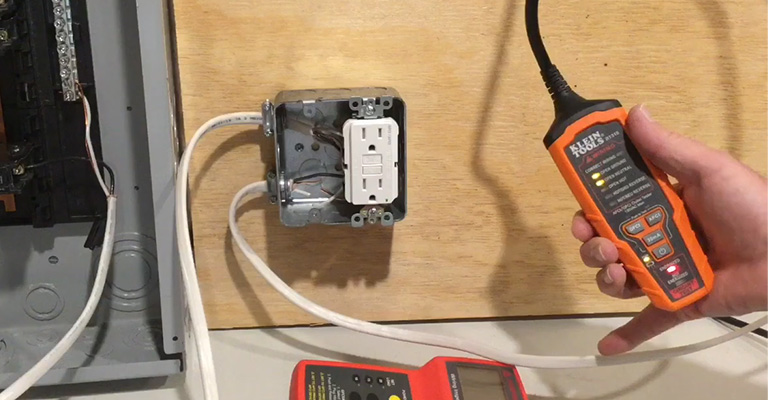
If you are working on a GFCI outlet, a 3-prong voltage tester, such as the Klein Tools RT210 Outlet Tester, is recommended.
With this tester, you can instantly determine if there is electricity flowing or not by plugging it in. The tester can determine if the problem with your GFCI is caused by incorrect wiring or the outlet itself.
Protective Gloves

When testing the GFCI breaker, your hands are the first part of your body that is exposed. Your working hand can be permanently damaged by common injuries such as Arc Blasts and Arc Flashes.
Whether you’re only checking the breaker’s test button or changing some settings inside the main panel, don’t underestimate the dangers. Always wear gloves that can withstand high voltages and always think about the worst-case scenario.
Occupational Safety and Health Administration (OSHA)-approved rubber insulating gloves are recommended. Additionally, you can wear a leather protector glove over the rubber to add an extra layer of protection.
Protective Footwear
Protect yourself from shock and electrocution in the event of a bad GFCI breaker. GFCI is usually found in areas with a large amount of moisture or water puddles. Ideally, you should wear boots or shoes with insulation to protect your feet.
Barefooted people are more likely to experience severe electrical ground accidents because their bodies provide a pathway for the current to flow through.
Electricians should wear footwear approved by the American National Standards Institute (ANSI).
Steps on Checking Your GFCI Breaker

Self-testing GFCI outlets and manual-testing GFCI outlets are both available. Both types of GFCI can be tested manually, but self-testing GFCIs have LED lights on the bottom.
The green light indicator should always be watched for because if it turns red, it needs to be replaced.
Alternatively, you can test your breaker manually. It is easy to troubleshoot GFCIs, and I am confident you can do it yourself.
Please take note of the following steps for a detailed explanation of how to check a GFCI breaker.
Step 1: Examine The Power Situation
Make sure that the outlet you are testing has a current flowing through it using your voltage tester. Testers that light up indicate that there is a flowing current in the outlet, but testers that don’t trip mean the outlet has a problem.
You will also be notified if your GFCI outlet has faulty wiring; if this is the case, you should contact a professional electrician.
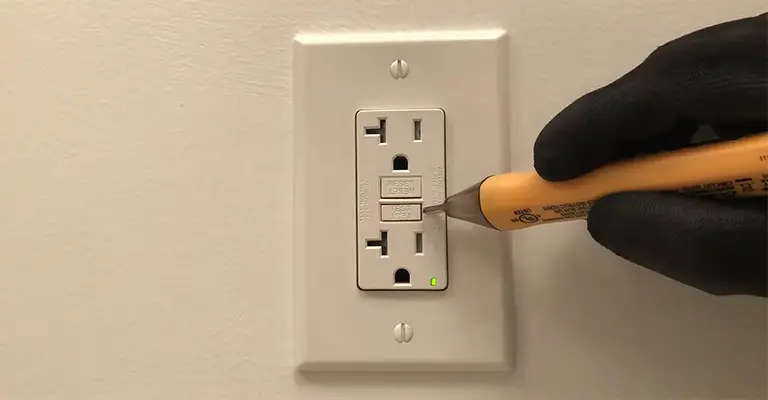
Step 2: Test Button Efficiency
The test button is located on the breaker itself. Press it to see if it trips. In the panel, there is a neutral bus that separates other neutral cables. The neutral wire of the breaker connects through this bus.
During testing, the neutral wire is short circuited to the neutral bus, resulting in a ground fault. It is easy to tell whether the GFCI breaker is working if the button moves and the electricity in the outlet is turned off.
Step 3: Restore Power With The Reset Button
You can restore power to your GFCI outlet by pressing the reset button. A breaker that cannot be reset means that power was not restored.
The main electrical panel may have the problem if all the GFCIs have the same problem. Even so, if this is the only outlet experiencing this problem, it needs to be replaced right away.
Pro Tips:
There is a 15-year warranty on GFCI outlets and breakers, depending on how they are used. A GFCI should be checked once a month and replaced every decade if you see any bad symptoms.
If you overload, you may experience early failure as well as overheating, which can cause the plastic to melt. A loose wiring can also be caused by overusing the breaker with constant plugging and pulling.
It is good to remember that GFCI outlets are not rust-proof, so they still need moisture protection in wet environments.
To protect the GFCI, you should provide a tight cover that can withstand extreme weather conditions.
Testing A GFCI Breaker With A Multimeter
A multimeter can be used to test the voltage supply from the outlets of a GFCI breaker by pushing its test and reset buttons.
Last but not least, open the outlet up so that you can inspect its wiring and ground connection. You should replace or repair the GFCI breaker or outlet if any of these tests fail.
The purpose of this step is to further examine whether the GFCI is functioning properly using a multimeter.
Inspect Voltage Supply In Outlet
The power supply to the electrical outlets is completely cut off once a good GFCI has been triggered.
No matter what the results of the test and reset button trials show, the multimeter test can help you determine whether or not the breaker performs this function.
You must first set the AC voltage dial on your multimeter. This is usually represented by “V~” or “VAC” on the meter.
The multimeter should also be set to the lowest voltage range. Your multimeter may have a lower range, but it is usually 200VAC on most multimeters.
Push the test button to simulate a ground fault and trip the GFCI. Insert your multimeter leads into the outlet slots after this has been done.
Hot slots are shorter, neutral slots are longer, and ground slots are semicircles. The black negative multimeter probe is inserted into the neutral slot, and the red positive probe is inserted into the hot slot.
It’s time to evaluate. When the test button has been pushed and the circuit breaker is suspected to be tripped, you shouldn’t expect the multimeter to show any value.
A value of zero (0) on the multimeter indicates that the breaker is working properly. In the event that you received a value other than zero, your GFCI outlet needs to be replaced because it has a fault.
It is possible that this fault is caused by a problem with the ground connection in the circuit, and we will discuss that in the following section. The reset button and overall voltage supply must be checked first, however.
You can now expect your outlet to have a voltage supply after you push the button. With a single-pole GFCI, you’ll get about 110V to 120V, whereas with a double-pole GFCI, you’ll get 220V to 240V.
Check the multimeter’s reading with the probes still in their previous positions (black probe in neutral slot, red probe in hot slot).
GFCI outlets may be defective if you do not receive a value within these ranges for your respective GFCI breaker class.
It is possible that incorrect wiring may be the cause of this, and you may proceed to the next step.
Check The Wiring In GFCI Outlet
Before you continue, turn off your home’s main electrical panel or fuse box to cut off power to your GFCI connection.
As we are now dealing directly with live wires carrying current and voltage, this ensures the most safety possible. The next step is to inspect each outlet slot wire once you have turned off the power.
Your GFCI socket circuit has two wires, the line wire going to the hot outlet slot and the load wire going to the neutral outlet slot.
Line wires are usually black, while load wires are white, and both should be connected to their respective slots. Your GFCI outlet may be malfunctioning because of a bad connection here.
When the connection is correct or once you have adjusted the connections appropriately, tighten the screws holding the wires in place. Your problem may be due to loose connections between these wires.
Check whether the GFCI outlet produces the right amount of voltage as expected during the multimeter voltage test by turning on the power supply at your home’s electrical panel.
Inspect GFCI Ground
The GFCI should also be grounded properly. The procedure is the same as testing voltage in outlet slots and is fairly simple.
The black probe should be placed in the semi-circle or “U”-shaped slot when testing the ground connection.
Upon doing this, you should get a reading of zero volts if the breaker is tripped and about 110 volts if electricity isn’t cut off.
In particular, the GFCI ensures that your wall outlet circuit is properly grounded, so if it fails this test, then it does not serve its purpose or ensure your safety.
If any of these tests indicate any other reading, the ground connection on the breaker circuit is faulty and should be repaired or replaced immediately.
Final Words
Not only when you notice problems with your outlets, but also frequently, you want to test your GFCI breaker in your home.
As a result, your appliances and important devices are always protected from electrical circuit shorts.
You may be able to diagnose your GFCI breaker using the external buttons, but a multimeter is the best tool to use for accurate diagnosis. You can also use it to check other appliances and devices in your home and vehicle.


