

When the Moen shower faucet won’t turn on, the most common causes are cartridge issues, broken valve stems, water leaks, clogged supply lines, and clogged shower valves.
Although there are a number of reasons for this problem, but cartridge problems are the most common one.
A small amount of grease rubbed on both sides of the cartridge can sometimes solve the issue. In most cases, however, it is necessary to replace the cartridge completely.
Learn more about how each of these problems can be solved in detail by reading this article. The Moen shower cartridge replacement can also be completed without a plumber if you prefer not to do it yourself. Let’s get started!
Different Ways To Fix A Moen Shower Faucet That Won’t Turn On
Shower faucets that won’t turn on can be caused by a variety of factors. In this section, we’ll cover the most common types.
1. The Faucet Or Showerhead Is Clogged
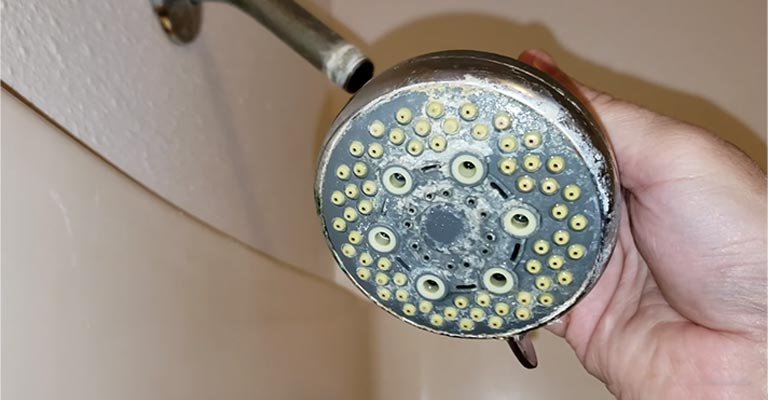
It is necessary to clean the shower faucet and showerhead in order for them to work properly. Water supply lines can become blocked by dirt in faucet components like washers, aerators, cartridges, and stems.
You won’t be able to turn on the water in that case. The same applies to the showerhead. When the system becomes clogged, dirt can build up and reduce the pressure of the flow of water.
To inspect the faucet and showerhead, you’ll need some tools. A good way to check inside the faucet is to take the faucet off with an Allen wrench.
The showerhead can be removed by twisting the shower pipe. If it’s stuck, remove it with a wrench and pliers. Once the showerhead has been removed, inspect the connection pipe and the showerhead itself.
Solution:
Cleaning these components should be done if dirt or debris builds up in them, causing them to become clogged.
Dirt can be removed from components by soaking them in a vinegar solution. To remove dirt effectively, let them sit overnight. Equal parts vinegar and water should be added to the solution.
Metal components can be cleaned with a metal scrubber while rubber components can be cleaned with a toothbrush. You should now have water flowing if you reinstall the showerhead or faucet, whichever had dirty components.
2. Valve Stem Broken
It is possible to experience severe wear and tear on the valve stem of a shower faucet after it has been used for a long time. Failure of the valve system will make it difficult for you to control the volume and temperature of the water.
There will eventually be a complete failure of the valve stem. If that happens, you won’t be able to use the shower.
Solution:
When your Moen shower faucet’s valve stem stops working, you need to replace the cartridge. For the Moen shower faucet, make sure you get the correct part number. You’d be in a bad position if you didn’t follow this rule.
3. Handle Is Loose

Shower handles must engage with valve stems for water to come out of the showerhead when turned.
A broken or loose handle, however, will not engage the valve stem and you won’t get any water. A valve stem can also be damaged if the handle is left unchecked.
Solution:
First, tighten the screw if the handle is slow. You’ll need an Allen wrench for Moen shower faucets.
Once you get water coming from your shower, you’re done. You need to replace the handle if it doesn’t solve the problem.
4. Shower Valve Clogged

Temperature and flow of water are controlled by shower valves. Water is mixed with cold water and its direction is controlled.
There is a good chance that your valve is broken or clogged if you only get hot or cold water or if your faucet does not turn on. The sound of grinding in the shower can sometimes be caused by faulty valves.
In addition to reducing water pressure, broken valve parts can also cause it to malfunction. You’ll see the same symptoms if the rubber ring of the valve is corroded.
Solution:
A Moen shower faucet’s shower valve is located within the cartridge. You’ll have to replace the cartridge if it’s broken or clogged.
Moen shower cartridges require many steps and there’s a whole section on how to replace them by yourself. Replace the cartridge to fix the problem.
5. A Clogged Tank Or Supply Line

Calcium and magnesium in hard water can clog the tank and supply lines if you have a tank with hard water.
There is a possibility that they will settle at the bottom of the tank, or that they will stick to the pipe surface. You won’t be able to get water from the shower when there is too much hard water in the system.
Solution:
Having water repair technicians clean these minerals can help prevent their build-up. Additionally, use a water softener to prevent future clogging of the supply lines and tanks.
When the water is too soft, the anode rod may also get corroded, so you should inspect it regularly after installing the water softener.
You should no longer experience problems with your water turning on if you keep your anode rod in check once every six months.
6. Leaks In The Water Supply
There would be very little or no water coming from the showerhead when there is a leak in the water tanks or the supply lines.
When there is a leak, the water pressure will also be reduced. There will often be a trickle of water from the shower head or no water at all if you have a leak.
There are several areas where leaks can occur, such as the showerhead, the pipes, or even the water tank itself. If you suspect your house has a leak, you should inspect it immediately.
Solution:
Identifying the leak is the first step. The first thing you should do is check the tank to see if there’s any water coming out of it or if there’s a pool of water surrounding it.
You may have a leaking tank if you see mold or algae growing there. See if there’s any mold growth on the walls if it’s not the water tank.
There will be a spot where water is leaking from if you find such a spot. Call a licensed plumber once you’ve identified the leak.
I’m sure that he can fix it for you. If the leak has been fixed, check the faucet again as it may still have leaks in other areas.
You will be able to solve your problem if your shower faucet works properly. In any case, the other leaks must be repaired.
7. Issues With Cartridges
An integral part of the shower system, the cartridge controls water flow. It is however possible to damage the seal within the cartridge if sediments or dirt build up inside the cartridge.
The shower faucet can become tight and difficult to turn on as a result. You’ll be able to detect worn-out cartridges by noticing water leaking through the faucet. A broken seal allows water to pass through the cartridge and cause this problem.
Solution:
It depends on the severity of the problem and the model number of your faucet whether you need to repair or replace the cartridge.
Use silicone-based grease to lubricate the inside and outside of a one-handle faucet with a 1225 cartridge. Avoid using grease containing petroleum.
The rubber seals of the faucet can be adversely affected by such lubricants with petroleum, causing the faucet to be more difficult to turn. Keep silicon sprays, faucet grease, and plumber’s faucet grease away from cartridges.
You will need to replace the cartridge for most other faucets, such as the one-handle faucet with a 1255 or 4000 cartridge, the two-handle faucet with a 1224 cartridge, and the Posi-temp shower with a 1222 cartridge.
How To Replace A Moen Shower Cartridge?

Be sure to get the correct cartridge for your faucet before we get started with the replacement guide.
It is recommended that you use OEM Moen cartridges, which are widely available. On the other hand, there are a lot of aftermarket cartridges on the market which are much cheaper.
A cartridge replacement will require many tools, including a new cartridge, rags, silicone grease, cartridge pullers, OEM handles, Allen wrenches, collars, handle buttons, screwdrivers, needle nose-pliers, flashlights, etc.
You should hire a professional plumber to replace the cartridge because it requires a lot of expertise. In case you decide to replace your own Moen shower cartridge, here are the steps:
Step 1: Turn Off The Water Supply
To begin working on the shower faucet, turn off the water supply. Turn off your house’s shower fixture valve to do it. Turn off the main shutoff valve if your shower doesn’t have fixture valves.
You can drain the pipes completely by turning on the lowest faucet in your home. It will empty out the pipes of all remaining water.
Step 2: Remove The Faucet Handle
With an Allen wrench, you can easily remove the screw holding the handle in place.
You will be able to remove the faucet handle easily once the screw has been removed. Prior to moving on to the next step, make sure you keep the handle and setscrew safe.
Step 3: Remove The Handle Adapter
It will be helpful if you have a Phillips screwdriver handy here, so that you can unscrew the black handle adapter from the faucet and pull it out.
There will be a white-colored part attached to it called the Temperature Stop Limiter when you pull it out.
Pull both of them together while making sure not to alter their positions, since you might lose your shower’s temperature settings. The part won’t be found in all Moen faucets, so don’t worry if it’s not there.
Step 4: Remove The Collar And Cartridge Retaining Clip
The collar can be removed once the handle adapter has been removed. In this case, you just need to remove the cartridge and you will see a retaining clip on top of it.
After you remove the retaining clip from the Moen single handle shower faucet cartridge, you need to remove the cartridge.
Make sure you remember where the retaining clip is before you remove it, so you can replace the cartridge in the same way after you remove it.
It is a good idea to take a picture of it before you remove it so you are more familiar with its location. Grab the retaining clip and pull it out with needle nose pliers.
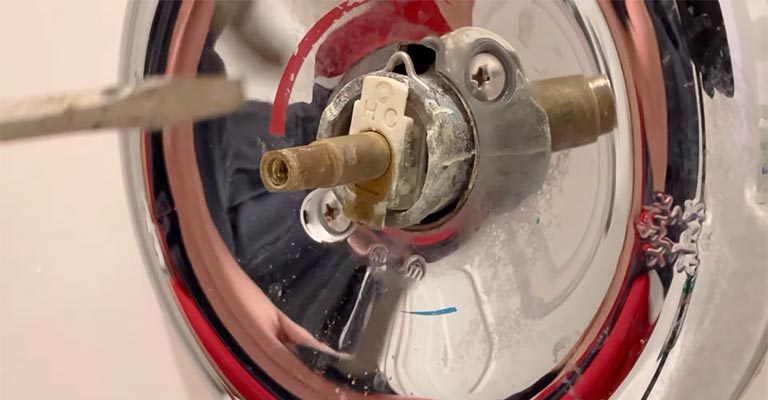
Step 5: Take Out The Cartridge
At this point, you should be paying the most attention to the process. You’ll have to call the plumber for an expensive repair if you break the cartridge when you try to pull it out.
Here’s how to do it safely without breaking it. Pull the cartridge stem with pliers first to see if that helps.
The white plastic adapter included with the new cartridge may work if the first doesn’t. Using it, you can remove the old cartridge as if it were a key.
Pull the cartridge out by fitting it onto the cartridge stem, grabbing the adapter with pliers, and rotating it back and forth.
Once the cartridge has come out a little bit, you can grab the stem with the pliers and pull out the entire cartridge.
There are times, however, when the cartridge won’t budge at all. A Moen cartridge puller will be needed to remove the cartridge if it won’t come out with the plastic adapter.
The puller screw should be tightened after the tool is placed in front of the cartridge. It will fit into the brass inner stem. If you want the screw to stay intact with the cartridge, make sure you tighten it straight and not cross-threaded.
Once you have driven the screw all the way in, tighten the collar of the puller. Once the cartridge gets loose, rotate the puller back and forth.
You can easily pull it out along with the puller when that happens. You can remove the cartridge from the puller by loosening the puller screw.
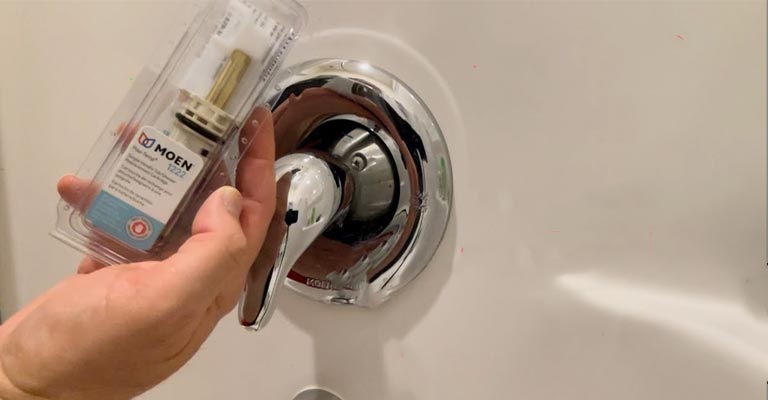
Step 6: Insert The New Cartridge
Put your hand inside the valve body before installing the new cartridge to make sure there is no debris inside.
The valve body may be clogged with twigs or sticks. Make sure that the valve body is clean by using a flashlight.
The valve body needs to be cleaned if dirt is found. A small amount of silicone grease should be applied to the rubber parts of the new cartridge to lubricate them.
When pushing the new cartridge into the valve body, you can use the plastic adapter to help keep the cartridge in place.
As you push the cartridge on, place the adapter in front of it, and grab it with the pliers to rotate it. Place the new cartridge in the same position as the old one.
Step 7: Insert The Retainer Clip Again
In order to seal the new cartridge in place, the retainer clip must be reinstalled. Retainer clips should be inserted all the way. Using a puller or plastic adapter, move the cartridge a little bit if you’re having trouble inserting it.
Step 8: Reassemble The Faucet Handle
Make sure your faucet is working properly after replacing the cartridge before fully reassembling the handle.
As you move counterclockwise, the water should get warmer and reach the maximum temperature when it’s on the left. Turning it back clockwise should result in the water becoming cooler.
Adjust the cartridge stem 180 degrees with pliers if it isn’t working in that order and you are getting warm water right away.
Once the Moen faucet no longer won’t turn on, you can begin reassembling the faucet handle once you’re sure the faucet is working correctly.
As soon as you have replaced the white Temperature Stop Limiter and the handle adapter back together, make sure they are positioned in the same way as they were before they were removed.
The handle adapter should be secured in place with the screw. To reassemble, place the handle, adjust it to the stem, and screw it with the Allen wrench.
How To Adjust The Temperature Stop Limiter?
Using this Moen shower valve troubleshooting guide, you now know how to turn on the Moen shower faucet. As we discussed in the third step of removing the cartridge, there is a temperature stop limiter you must remove.
In order to protect you from accidental scalding, it controls the maximum temperature of the water in your shower. In order to get hot water, you can only turn the handle so far.
Due to the fact that you have already accessed it to remove the cartridge, it can be adjusted so that you can fine-tune the shower’s temperature settings. Move the outer piece to the right to decrease the temperature.
There is a linear relationship between the number of splines moved and the amount of change. Turn the outer piece left to increase the temperature.
Temperature adjustments should be done with care, especially when it comes to hot water. You can adjust the temperature little by little until you like it.
Frequently Asked Questions
1. How Come My Moen Shower Doesn’t Have Hot Water?
It’s most common for the Moen shower to not provide hot water when both cold and hold water are not flowing into the valve due to obstructions in the spout or showerhead.
2. How Come My Moen Shower Has Both Cold And Hot Sides Reversed?
It is obvious that the hot and cold sides of the cartridge have been reversed, which indicates an improper installation. If you rotate the cartridge stem 180 degrees, you’ll be able to get hot and cold water from the right places.
3. How Can I Make The Moen Shower Handle Easier To Turn?
A hard-to-turn shower handle may also indicate a problem with the cartridge. It should be possible to resolve the issue by either lubricating the cartridge with silicon grease or replacing it.
4. What Should Be The Maximum Temperature Of The Water?
A person can be scalded by hot water above 120 degrees Fahrenheit. For the best shower experience, hot water should be below this temperature, which is why the Temperature Stop Limiter on Moen faucets is so useful.
Conclusion
You now know why the Moen shower faucet won’t turn on is the cartridge, and you know how to replace it. It’s also possible that there are other causes behind the problem.
In order to find out what’s causing the shower to not work, you need to do a thorough inspection.


