

Tile countertops were once the epitome of chic kitchen designs, but as trends evolve, you might find yourself yearning for a sleeker and more sophisticated look.
However, completely tearing out your existing tiles and starting from scratch can be a daunting and expensive task.
No worries. Let’s explore a transformative method that promises to breathe new life into your kitchen without the hassle of a complete overhaul.
I am talking about the magic of thin quartz – a sleek and stylish alternative that can instantly elevate the look of your tired tile countertops.
If you’ve been yearning for a modern and sophisticated touch, this might just be the solution you’ve been waiting for.
Tile, laminate, stainless steel, granite, quartz, concrete, and wood counters can be overlaid, as long as they’re strong enough to support it.
A Simple Guide To Covering Tile Countertops With Thin Quartz
With ultra-thin quartz countertops, your space will have a clean, updated look. This type of flooring is perfect for modern homes due to its clean, slick appearance.
Quartz thin slabs are perfect for kitchens and bathrooms because they bring your space to life with upgraded designs.
Are you a fan of quartz’s look? Is your tile countertop already installed? You don’t need to make major renovations. Your existing tile countertops can now have that clean quartz look. Here’s how.
Things You’ll Need
The following will be needed before we begin the project:
- Hammer
- Pry bar
- Old newspapers
- Pipe wrench
- Damp sponge
- Tape
- Putty knife
- Adhesive gun
- Joint sealant
- Notched trowel
- Measuring tape
- Thin-set mortar
- Pencil and graphing paper
Once you have prepared all the materials we need, we can now move forward with the project. Make sure your floors and cabinets are protected.
Make sure your cabinets are covered with old newspapers. Make sure they stick by using tape. Use the remaining newspapers to cover the floor surrounding your countertop. Tape is not necessary.
1. Preparing The Cut-Outs
Draw a line on the paper and trace the area you wish to replace on the countertop. If you want to replace an entire area, be sure to cover it completely.
Trace around fixtures such as sinks, faucets, and nozzles if there are any. As a result of these cut-outs, quartz measurements can be made more accurately.
2. Preparing The Quartz
Take a measurement of your countertop surface. The quartz countertop surface that you are planning to install should be measured closely for width and length.
You can then choose your slab at Granite Selection or your local stone manufacturer.
There are plenty of quartz slabs available, so you will have no problem finding one that suits your needs. It is impossible to go wrong with Granite Selection, whatever your choice may be.
You must provide a stone manufacturer with the cut-outs and measurements after choosing your countertop surface.
This allows them to prepare the stone precisely, taking into account where your sink and other fixtures will be installed.
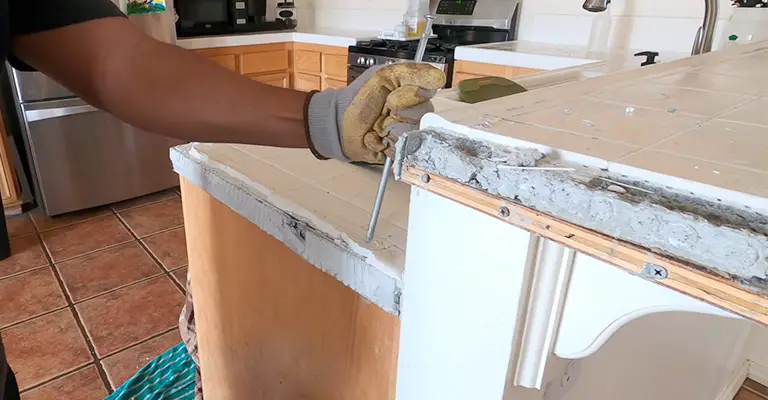
3. Removing The Tiles
Quartz installation will be easier if we remove the old surface first. It can be difficult, however, to remove the tiles. Here’s how you can remove tiles carefully without ruining your countertop:
If the sink has a water supply, turn it off. Make sure the faucet and drain are removed and unmount the sink carefully with a pipe wrench.
If you remove any screws or mounting clips, set them aside and secure them – you’ll need them again when you reinstall the sink.
Remove the tiles with the pry bar. Insert the edge of the bar under the front edge of the tile closest to the wall.
To loosen the tile, tap it gently with the hammer without damaging the countertop. Pry the tile away from the countertop once the mortar has been loosened.
You can now expose the countertop by removing all the tiles. Remove all debris from the surface after removing all the tiles.
Smooth the rough surface with a putty knife by running the knife across it and leveling it.
Use a damp sponge to clean the exposed surface. You should remove all dust and debris from the surface and let it dry completely before working on it.
4. Applying The Adhesive
Thin-set mortar must be prepared in advance. Cover the entire surface with mortar. Spread the putty evenly across the entire surface with the putty knife.
It is important that you coat the entire surface sufficiently with mortar in order for your thin quartz to stick.
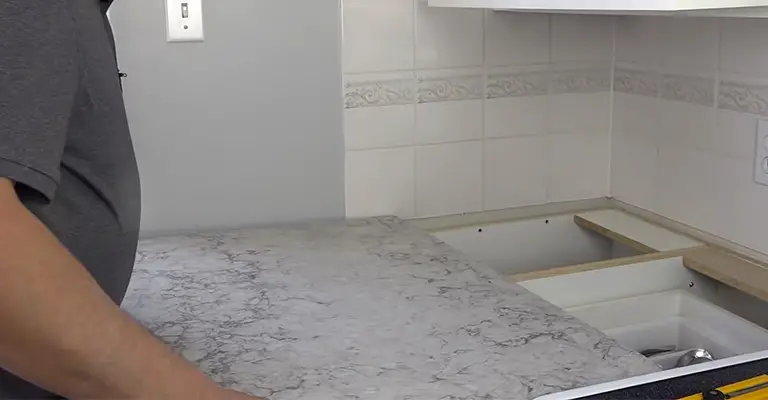
5. Installing The Quartz
Place the quartz slab gently over your countertop. If you are lifting the countertop, make sure you have enough helpers with you. If you try to lift your quartz yourself, it may be too heavy for you, resulting in some serious injuries.
If the slab is not supported, you may drop it and damage the slab, your floors, or both. The placement of the slab will also be easier if you grab a friend.
Use the rubber mallet to secure the slab once it has been placed. The surface should be “knocked” into place gently along countertop edges and between them. As a result, your surface will also be level.
6. Finishing With The Joint Sealer
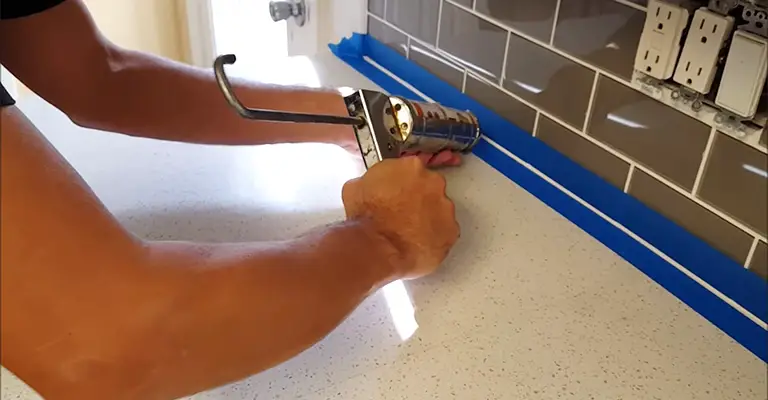
Use a joint sealer to fill in any gaps in the countertop. Apply it to the desired location using an adhesive gun.
Be generous at all times. You can keep them in place with a putty knife and clean off any excess with a damp sponge.
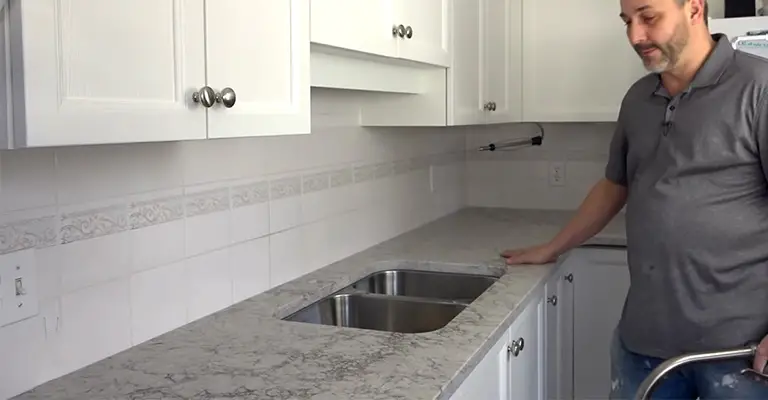
7. Finishing Touches
We removed the fixtures, remember? Now is the time to install them again. The first step is to note where the sink is located on the new countertop. You need to mark where the holes need to be with a pencil once the sink is upside down on the counter.
For mounting the clip, drill holes for screws. The sinkhole edges should be covered with adhesive. To secure the sink, place it in the hole and press down along the edges for 10 seconds.
It is more difficult to install an undermount sink. Before installing the quartz slab, follow the same steps as above.
Do Quartz Countertops Come In A Variety Of Colors?
There are a variety of colors available for quartz countertops. They can be manufactured in virtually any color or pattern due to their engineering.
Quartz countertops can be found in browns, greys, whites, beiges, and blacks. Other colors, such as green, blue, pink, and purple, are available to more adventurous homeowners.
There is also the option of designing quartz countertops with veining to mimic the look of marble or other natural stone countertops. The versatility of quartz allows homeowners to create a unique kitchen or bathroom design.
Are Quartz Countertops Heat Resistant?
The heat resistance of quartz countertops makes them a popular choice among homeowners who want the durability of stone without having to worry about damaging their investment.
There are variations in how well quartz countertops withstand high temperatures, though they are all heat-resistant to some extent.
If you choose quartz countertops for your kitchen, it is important to consider the shade, as darker colors may absorb more heat than lighter colors.
How Do I Clean Quartz Countertops?
You should clean your quartz countertop regularly to keep it looking its best. Warm water and mild detergent are the best ways to clean quartz.
Using a damp cloth, wipe the surface down, ensuring that all soap residue is removed. A gentle scrubbing brush may be necessary for tougher stains.
The quartz surface is also heat-resistant, so vinegar or lemon juice can be used as a household cleaner. After using the cleaner, make sure to rinse it away completely.
Final Words
It might seem like a fun DIY project to cover your tile countertops with a thin quartz surface, but it’s actually quite time-consuming. In addition to the actual installation work, there is a lot of prep work to do.
In the beginning, it might seem impossible to replace a tile countertop with a thin quartz countertop, but if done correctly, it is not difficult. It’s best to call in a professional if you need assistance.


