
A hole in a wooden door can be an eyesore, ruining the overall appearance of your home’s interior. Whether it’s a small hole from a doorknob or a larger hole from an accidental bump or scratch, fixing it can seem like a daunting task.
But fear not! With the right tools and techniques, you can quickly repair a hole in a wooden door and make it look as good as new.
In this guide, we will explore the step-by-step process for fixing a hole in a wooden door, so you can restore your door’s beauty and functionality without needing a costly replacement.
So, if you’re ready to roll up your sleeves and tackle this DIY project, read on to learn how to fix a hole in a wooden door like a pro.
Can A Hole In A Wood Door Be Repaired?
There is nothing better than a wooden door for aesthetics and strength. In contrast, a deep scratch or significant hole in a wooden door can look bad and damage the door’s structure.
What’s up with your holey door? Fortunately, it can probably be fixed by yourself. A hollow interior is a standard for most interior doors.
It is possible to patch or fill hollow doors, depending on your preference and what is available. Using wood filler, you can quickly and easily patch a hole in a hollow or solid door.
How Do You Fix A Hole In A Wooden Door?
You can repair a hole in a door without expertise using standard tools. Having your tools at hand, follow the simple steps below to fill the hole once you’ve got them ready.
Tools and Materials
Gather the tools you’ll need before you begin the repair. Here are the items you’ll need:
- Sandpaper
- Insulating foam
- Utility knife
- Paint to match the door
- Putty knife
- Auto body filler or plastic wood filler
- Pliers
- Cardboard
Almost anyone can fix a hole in a hollow-core door without any special skills. This step-by-step guide will help you get started.
1. Remove The Door
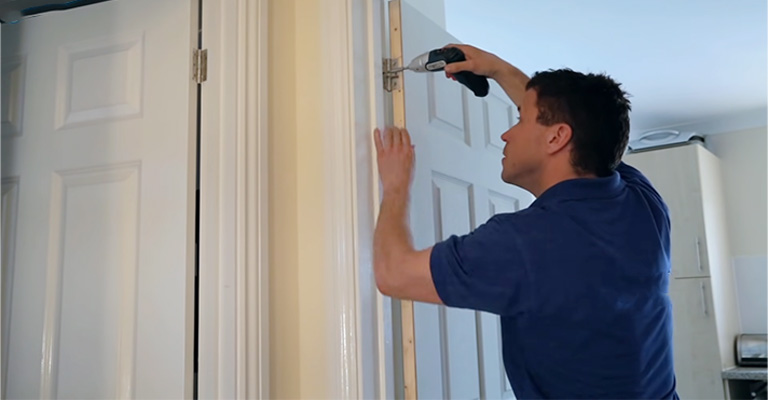
Remove the door’s hinges so you can work on a level surface with it. A hammer is all you need to remove the pin from most interior doors before lifting the door off its hinge.
When you take the door off its hinges, lay it flat on a level surface where it can be worked on easily. The floor will also work if you don’t have a large enough workbench or table.
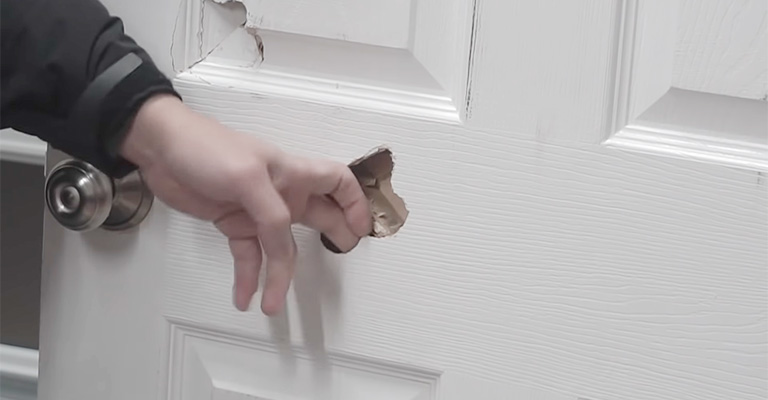
2. Clean Up The Hole
Ensure the hole’s edges are cleaned with your utility knife and pliers. You will need to make clean cuts into the door to remove excess debris from the impact that caused the hole.
Usually, if you apply light pressure to the spot around the hole, it will feel weak. If this is the case, the interior wood of the door has folded in on itself.
To make the hole bigger, use your utility knife and cut around it until the edges surrounding the hole are stable and solid.
3. Support With Cardboard
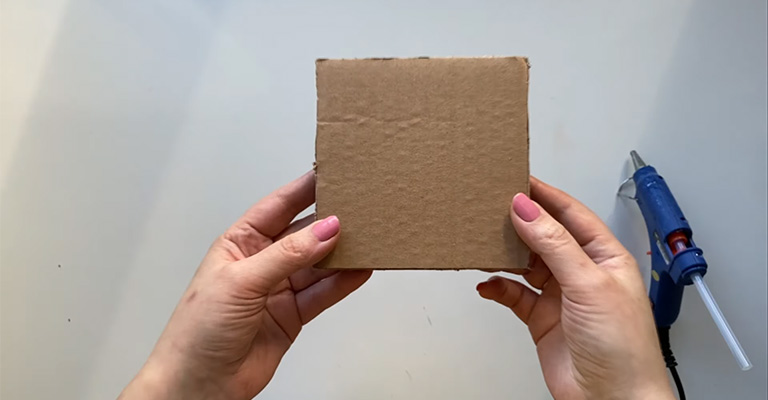
Using paper clips, cut a strip of cardboard and roll it up so you can insert it into the door hole.
Following patching the hole, this cardboard will provide support inside the door. You can also use paper towels for this step, according to wikiHow.
4. Add Insulating Foam
Having arranged the cardboard around the edges of the hole’s interior, you should have a hollow area within it.
Ensure that the hole is filled carefully with expanding foam insulation. Considering that it will grow, you shouldn’t overfill and cause your door to crack.
You must wait for the foam to dry for a few hours. Ensure that the door is left in a safe place so that the foam can cure.
Painter’s tape can be used to preclude the foam from adhering to the door exterior around the hole. Upon the top of that, the foam will rest.
When the foam is dry, the excess should be trimmed off cleanly using your utility knife.
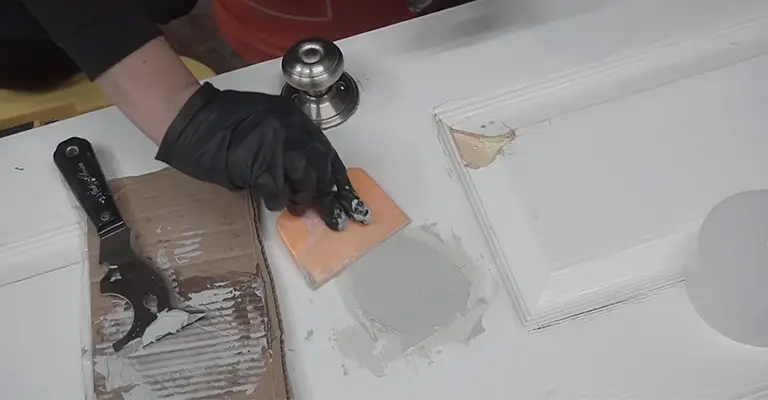
5. Apply A Coat Of Filler
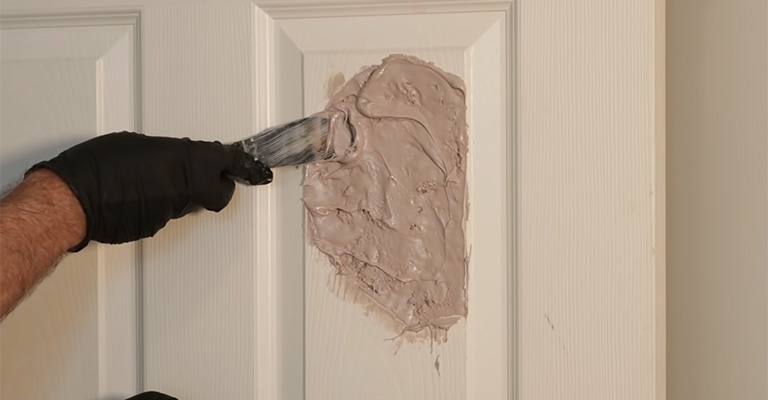
The plastic wood filler or auto body filler must be applied over the insulation foam. Smooth the filler so that it is level with the door using a craft stick or putty knife.
Be generous with the filler around the hole, including the door surface. There is no need to worry about extra filler since sanding will thoroughly level the surface.
6. Sand The Filler
In the meantime, grab your sandpaper and begin sanding the plastic wood filler after it has dried. Make sure the door surface and the door hole are smooth to the touch.
7. Time To Paint
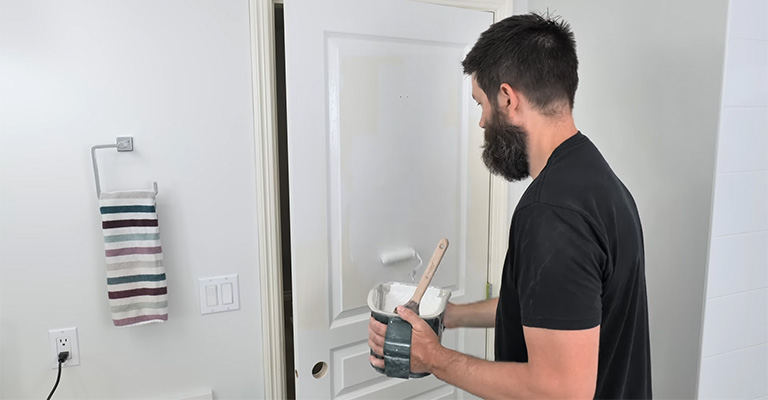
The surface is now level, and the painting can begin. To prevent repainting the entire door, make sure you find an exact match for your door.
After letting the paint dry, return the hinges to the door. The hole should now be a distant memory!
It is possible that you will experience the same problem again if the damage occurred because of something in the door’s permanent environment — like a doorstop or doorknob.
Install a wall guard at the impact point on the back of the door. By doing this, you will prevent yourself from having to fix the hole in the door again in the future.
How Do You Repair a Solid Wood Door?
It is slightly different to fix a solid-core door since additional materials are required.
Besides the material required for a hollow-core door repair, you’ll also need a wooden dowel, C-clamps, carpenter’s glue, drywall compound, and a handsaw.
Here’s What To Do:
- To remove the solid wood door from its hinges, follow the same steps as you did with the hollow-core door.
- Choose a wooden dowel with a diameter that is approximately the same as the door hole. Be sure to cut the dowel almost the same width as your door.
- You should coat the dowel in carpenter’s glue and use your hammer to guide it through the hole until it’s flush with the door’s surface on both sides.
- The glue may require you to cut down one side of the door so that it is level with the rest once it has dried.
- Using wood filler, fill both sides. Dry it and sand it down.
- Prep and paint the walls.
How To Repair Irregular Holes On Solid Doors?
If the hole is irregular or very large, it may take a bit longer to fix, but it can save the door from needing to be replaced entirely.
To repair a hole in a solid wood door, follow the same instructions as you would for a hollow door.
A piece of wood is clamped to one side of the door to support the filling material. Make large or irregular holes look new with epoxy wood filler mixed with hardener.
The surface will be smooth once it is troweled into the hole. When it is dry, leave the patch with a slightly concave center. Remove the C-clamp and wood on the other side of the door after the filler has hardened.
Coat both sides of the exposed patch with joint drywall compound. Patch the drywall when the joint compound has dried and prime or paint it.
Can You Patch a Hollow Door?
Adding a patch to a hollow-core door is a simple and common activity. The simple process can be completed in a few hours with minimal skill and the right materials.
How Much Does It Cost to Fix a Hole in a Door?
The price of repairing a hole in a door can sometimes exceed the cost of replacing the entire door. You only need to pay for the supplies if you’re going to perform the patch yourself.
Final Words
It is common for people to accidentally puncture hollow-core interior doors during their everyday lives since hollow-core doors are lightweight, somewhat fragile, and easy to damage.
Some may smash them into a doorstop they forgot was there or slammed one into the leg of a chair while moving from one room to another. As a result, holes are often made in the door, and repair is not something that can wait.
When a hole in a door opens, the only solution is to fill it – and it can be difficult to get the filler to stick in the hole and prevent it from cracking after hardening.
DIYers can use a simple hack to guarantee the filler stays right where you put it without cracking. A person with limited woodworking knowledge can easily complete this project.
The procedure works great for patching holes in drywall and other flimsy materials, but you’ll have to paint the door to hide the repair. Even though it requires more effort, it’s a better option than buying a new door.


