
If you’re experiencing a clogged sink or slow-draining water, the cause may be a damaged or stuck drain flange.
This component is an important part of your sink’s plumbing system, as it connects the sink to the drain pipe and helps to prevent leaks.
Removing a stuck drain flange can seem like a daunting task, but with the right tools and a little bit of elbow grease, it’s a task that you can tackle on your own.
In this blog post, we’ll walk you through the steps of how to safely and effectively remove a stuck kitchen sink drain flange, so you can get your sink functioning properly again.
Step By Step Guide On Removing A Stuck Kitchen Sink Drain Flange
A block of wood should be placed under the sink against the bottom of the flange and hammered firmly to remove it. If any stubborn rust or putty is present, the force should be sufficient to break it and loosen the flange.
To remove a stuck kitchen sink drain flange, you will need the following tools:
- A pair of pliers or a pipe wrench
- A screwdriver
- A basin wrench or a pipe socket wrench
- A bucket
- A towel
Here are the steps to follow:
- Turn off the water supply to your sink and place a bucket under the pipes to catch any water that may drain out.
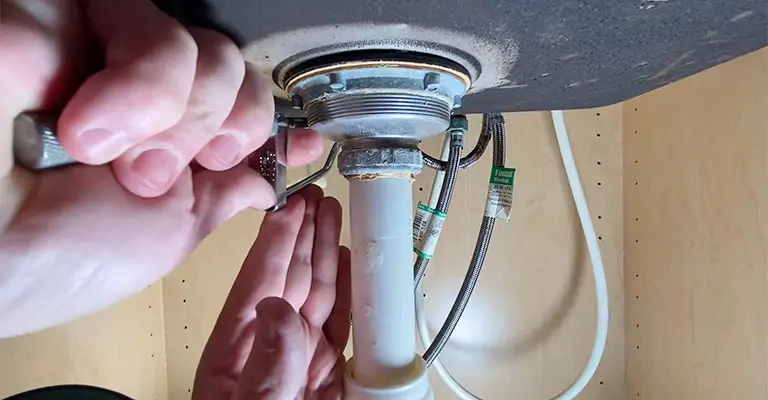
- Use a pair of pliers or a pipe wrench to loosen the locking nut that holds the flange in place. This nut is usually located under the sink, near the base of the drain.
- Once the nut is loosened, use a screwdriver to pry the flange out of the sink gently. If the flange is stuck, you may need to use a basin wrench or a pipe socket wrench to rotate it until it comes loose gently.
- Once the flange is removed, clean any debris or gunk that may have accumulated around the drain.
- If the flange is damaged, you will need to purchase a new one. Make sure to get the correct size and type for your sink.
- To install the new flange, simply follow the reverse of the steps above. Make sure to tighten the locking nut securely, but be careful not to overtighten it.
- Once the flange is securely in place, turn the water supply back on and test the sink to make sure it is draining properly.
With these steps, you should be able to successfully remove a stuck kitchen sink drain flange and get your sink functioning properly again.
If you have any difficulty with these steps or encounter any unexpected problems, it is always best to consult a professional plumber for assistance.
How to Remove a Stuck Kitchen Sink Drain Flange [According To eHow]
If your sink drain is leaking, you will need to remove the existing flange from the sink drain. From the top of the sink, you can see the drain flange.
It is common for the nut to turn with the whole flange when trying to remove the old one. In most cases, rust or sediment forms on the threads between the retaining nut and the flange.
While plumbers have special tools to handle this problem, homeowners can use regular hand tools and a helper to remove a stuck kitchen sink drain flange.
Things You’ll Need
- Putty Knife
- Slip-Joint Pliers
- Pipe Wrench
- Penetrating Lubricant
- 2-By-4-Inch Block Of Wood, 1-Foot Long
- Screwdriver
- Hammer
Step 1
Make sure the threads between the securing nut and the drain flange are lubricated with penetrating lubricant.
Between the top of the nut and the sink, spray around the bottom where they meet. Ten minutes is enough time for the lubricant to work.
Step 2
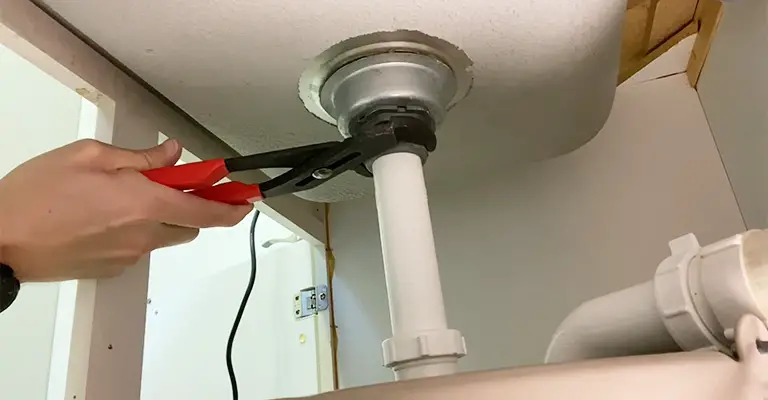
The handles of slip-join pliers should be inserted inside the drain cross piece with the slip-join pliers. Handles should be inserted into opposite holes.
Take a screwdriver and insert it between the handles. With the screwdriver as a handle, ask your helper to hold the pliers.
Step 3
With the pipe wrench, turn the securing nut under the sink counterclockwise. To get the nut to turn, you may need to turn it just enough clockwise to break the rust or sediment seal.
The nut will turn counterclockwise once the rust or sediment breaks. By using the pliers’ handles, you can prevent the drain flange from turning with the nut.
Step 4
A block of wood should be placed flat against the drain flange. Using the hammer a couple of times on the wood block is recommended.
Doing this will allow you to use a putty knife to cut through the adhesive on the sink drain flange.
Step 5
Make sure the putty knife is inserted between the drain flange and the sink at the top of the sink. Lift the drain flange with your fingers while cutting through the plumber’s putty with a putty knife.
Once you have removed the drain flange from the sink, continue to work through the putty.
Drain Flange Types: Everything You Need To Know
Your water system depends on drain flanges to function properly. Even though they are small, they prevent leaks and malfunctions in your sinks that can cause severe damage to your house.
The Bathroom Flange
In addition to drain flanges in the bathtub or shower, you may also find them in the bathroom. There is a common misconception that they are rubber gaskets.
The rubber gaskets in your bathtub also need to be replaced regularly, especially when they degrade quickly and cause leaks.
The Toilet Flange
The closet flange is on the bottom of the toilet, where the toilet connects to the drainpipe. It takes more skill and tools to replace a closet flange than a sink flange, but it won’t be difficult if you know how to remove and install a toilet.
The Sink Drain Flange
You can see a seam around the drain basket of your kitchen sink, also known as a sink flange gasket.
Over time, flanges become clogged with dirt and grease and lose their ability to support your water system fixtures.
As they degrade, a water leak will be inside the kitchen cabinet underneath the sink. A simple problem like this may lead to severe damage and cost thousands of dollars to repair if not resolved.
Therefore, quick action is necessary. It is easy and cost-effective to replace flanges. Check the flange if you notice a leak inside the cabinetry or notice something wrong with the drain.
It can be difficult to remove the old flange because it can adhere to the pipe below. It is also possible for the garbage disposal to obstruct the drain opening.
How To Avoid Kitchen Drain Flange Blockage?
Typically, a stuck kitchen drain flange is caused by the hardening of the plumber’s putty. However, other factors can also contribute to the problem.
Abusing your plumbing system and flushing food and waste down the drain can also cause a drain pipe failure. Flange blockages may also result from that failure.
Most plumbing problems can be diagnosed easily by identifying their source. There may be a small leak, low hot water pressure, or a strange odor. If something like this happens, your drain system may malfunctioning.
To avoid flange blockages, you should not put the following down your kitchen drain:
- Paint
- Medication
- Cotton balls
- Oils, fat, and grease
- Eggshells
- Coffee grounds
Regardless of your best intentions and habits, there is always the possibility of experiencing a clogged drain flange.
Final Words
It is necessary to remove the kitchen sink drain basket when installing a garbage disposal, replacing the sink, or simply installing a new sink drain flange.
Food particles and water can seep beneath the flange and into the threads, causing the drain to become clogged.
Your drain flange may seem to have been attached with permanent glue or cement when it was originally installed.
If you have a stuck kitchen sink drain flange, you don’t have to get out the heavy machinery just yet. Just follow the steps mentioned above.


