
When faced with a plumbing emergency or the need for repairs, shutting off the water supply to a sink becomes essential. Most sinks are equipped with a shut-off valve located beneath the basin, allowing for convenient water control.
However, in certain situations, you may encounter a sink without a valve, leaving you wondering how to effectively shut off the water flow.
Whether you’re dealing with a broken valve or a sink that lacks one altogether, this guide aims to provide you with practical solutions to tackle this issue.
By following these steps, you can gain the confidence to handle plumbing emergencies or carry out repairs without the worry of a persistent water supply.
Please note that the methods discussed in this guide may vary depending on your specific sink configuration and plumbing setup.
It is crucial to exercise caution and consider contacting a professional plumber if you are uncertain about any steps or if the situation seems beyond your capabilities.
Now, let’s dive into the various methods you can employ to shut off the water to a sink when a valve is not present, ensuring you can handle plumbing emergencies with ease and efficiency.
Understanding the Water Supply System
In order to effectively shut off the water to a sink without a valve, it is essential to understand the typical water supply system found in residential settings.
In most cases, the water supply for sinks comes from the main water line connected to the house. This line branches off to various fixtures, including sinks, toilets, showers, and more.
Shut-Off Valves And Their Absence In Some Installations
Shut-off valves play a crucial role in controlling the water flow to individual fixtures, such as sinks. They act as a convenient means of shutting off the water supply for repairs, maintenance, or emergencies.
However, it is not uncommon to encounter situations where shut-off valves are either missing or not installed for various reasons.
Some older homes or DIY installations might lack dedicated shut-off valves, posing a challenge when attempting to shut off the water to a sink.
Challenges Faced When Shutting Off Water Without a Valve
When a dedicated shut-off valve is absent, shutting off the water to a sink becomes more complex and potentially time-consuming.
It requires alternative methods that may involve shutting off the main water supply to the entire house or using other components of the plumbing system, such as the water heater or water line.
These methods can be unfamiliar to many homeowners and may pose challenges in terms of accessibility, safety, and the impact on other fixtures or appliances in the house.
How To Shut Off Water To A Sink Without A Valve: A Practical Guide
The safest solution would be to shut off the water at the water meter. After that, cut the pipe and install the appropriate valve. Shut off the water for whatever project needs to be done. All that’s left to do is reconnect your sink.
It is, however, possible to pack the pipe with dry ice at least 10 inches (254mm) above the cabinet floor if you like taking risks with your property. As soon as the water is frozen, cut the pipe and install the appropriate valve.
Place the valve in place and close it. Let the pipe thaw gently. The pipe may still be intact if you were lucky, if not, then see the first paragraph.
Maybe there’s a valve somewhere, perhaps on that floor or in that branch of the plumbing. Those are two valves, one for hot water and one for cold water.
Otherwise, you’ll have to turn off the water to the entire house while you make repairs (and hopefully install some valves under the sink).
The Curb Stop on the street side of the meter, which is the valve on the street side of the meter, can be shut off with the main shut off valve for the house or directly with the meter setter in your basement.
When installing a new fixture or preparing for a future problem, install a shut-off valve to prevent the same inconvenience.
Method 1: Shutting Off the Main Water Supply
Locating the main water shut-off valve is crucial when you need to shut off the water supply to a sink without a dedicated valve.
The main shut-off valve is typically located near the water meter or where the main water line enters the house. Common locations include basements, crawl spaces, utility rooms, garages, or outside near the foundation.
To locate the main shut-off valve, start by tracing the path of the main water line from where it enters the house.
Look for a valve along this line or near the water meter. The valve is usually a round or lever handle, often colored red or yellow for easy identification.
Step-by-Step Instructions on Shutting Off the Main Water Supply
- Before attempting to shut off the main water supply, ensure everyone in the house is aware and prepared for the temporary water interruption.
- Once you’ve located the main shut-off valve, make sure it is accessible and not obstructed.
- If the valve has a round handle, turn it clockwise (to the right) to close the valve. If it has a lever handle, move it perpendicular to the pipe (usually across the pipe) to shut off the water.
- Slowly turn off the valve to avoid putting excessive stress on the plumbing system.
- After shutting off the valve, check faucets, showers, and other fixtures to verify that the water supply has been successfully shut off.
Importance of Caution and Safety Measures
When shutting off the main water supply, it is crucial to exercise caution and follow safety measures to prevent any potential accidents or damage:
- Be gentle when turning the valve to avoid applying excessive force that could damage the valve or plumbing.
- If the valve is stiff or difficult to turn, do not force it. Contact a professional plumber for assistance.
- Familiarize yourself with the location of the main shut-off valve beforehand to ensure quick access during emergencies.
- Consider labeling or marking the main shut-off valve for easy identification.
- In freezing temperatures, take precautions to prevent the main shut-off valve from freezing or becoming inaccessible.
- After completing repairs or maintenance, remember to reopen the main shut-off valve slowly to prevent a surge of water that could damage the plumbing system.
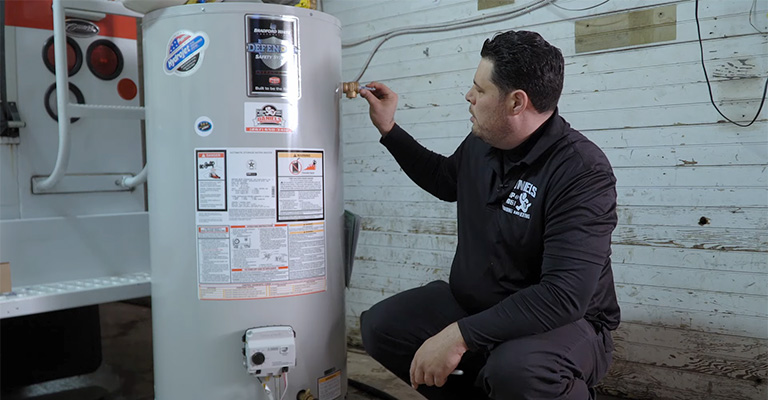
Method 2: Shutting Off Water at the Water Heater
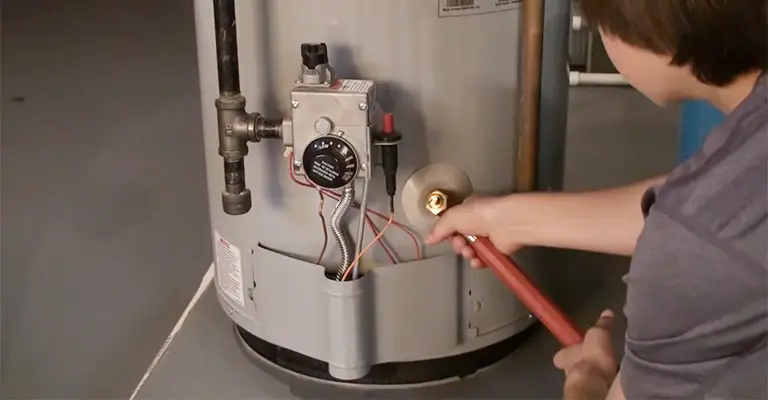
The water heater is typically located in a utility room, basement, garage, or closet. It is a large tank that heats and stores hot water for household use.
The shut-off valve for the water heater is typically found near the top of the unit or on the water supply line connected to the heater.
The Process of Turning Off the Water Supply at the Water Heater
- Start by locating the shut-off valve on the water heater. It is usually a lever-type valve or a round handle valve.
- If the valve is a lever-type, position it perpendicular to the water pipe to shut off the water supply. For a round handle valve, turn it clockwise (to the right) until it is fully closed.
- Once the valve is closed, check the faucets and fixtures connected to the water heater to ensure the water flow has stopped.
- To confirm that the water heater is completely shut off, run a hot water tap for a few seconds and verify that no hot water is flowing.
Considerations for Different Types of Water Heaters (e.g., Gas, Electric)
- Gas Water Heaters: If you have a gas water heater, exercise caution when shutting off the water supply. Familiarize yourself with the gas shut-off valve located on the gas line leading to the heater. In case of a gas leak or any concerns, turn off the gas supply to the water heater by closing the gas shut-off valve. Contact a professional if you suspect a gas leak.
- Electric Water Heaters: With electric water heaters, there is no need to worry about shutting off the gas supply. Simply turn off the water supply at the shut-off valve as described above. However, if you plan to drain the water heater, switch off the electrical power to the heater at the circuit breaker panel to prevent any accidents or damage.
Note: It’s important to remember that shutting off the water supply at the water heater will affect the availability of hot water throughout the house.
Use this method when you specifically need to shut off the water to a sink without a dedicated valve, keeping in mind the impact on other fixtures and appliances that rely on the water heater.
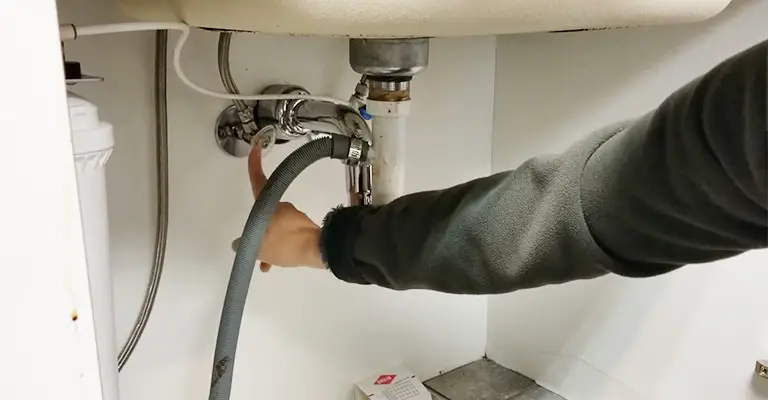
Method 3: Shutting Off Water at the Water Line
When a sink lacks a dedicated shut-off valve, an alternative option is to shut off the water by accessing the water line that supplies water to the sink. The water line is the pipe that delivers water from the main supply to the sink and other fixtures.
Identifying the Water Line Leading to the Sink
To identify the water line leading to the sink, follow these steps:
- Start by locating the pipes beneath the sink. There are typically two pipes: one for hot water and one for cold water.
- Trace these pipes backward from the sink toward the wall or floor. This will lead you to the main water line.
- The main water line may be made of copper, PVC, or other materials. It is usually larger in diameter than the supply lines to the sink.
- Take note of any valves or junctions along the water line that could potentially be used to shut off the water.
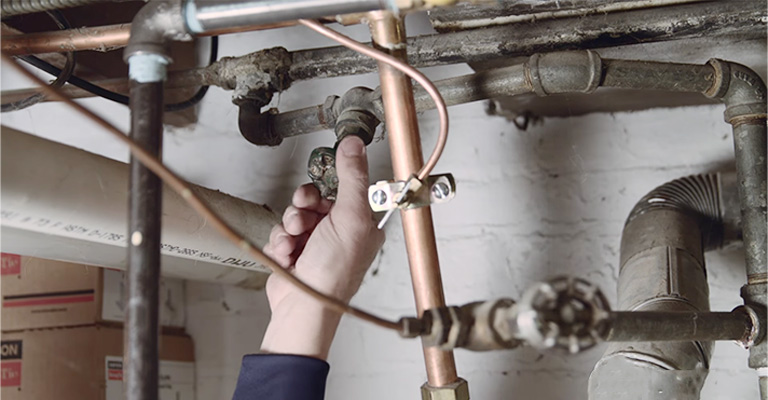
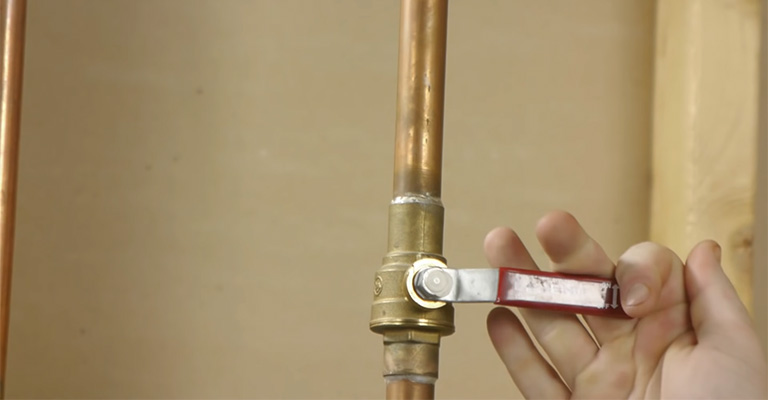
How to Shut Off Water by Turning the Valve at the Water Line
- Once you have identified the water line, look for a valve along the line that can be used to shut off the water supply. It may be a gate valve, ball valve, or compression valve.
- If it is a gate valve, turn the handle clockwise (to the right) until it stops to close the valve. For a ball valve, turn the lever handle perpendicular to the pipe to shut off the water.
- If the valve is a compression valve, use an adjustable wrench to tighten the valve clockwise until it is fully closed. Compression valves usually have a nut-shaped handle.
- After closing the valve, check the sink faucets to ensure the water supply has been successfully shut off.
It is important to note that the location and type of valve may vary depending on the plumbing system. If you are unsure about the valve or encounter any difficulties, it is recommended to consult a professional plumber for assistance.
Final Words
By understanding the option of shutting off the water by locating the water line, identifying the water line leading to the sink, and knowing how to turn off the valve at the water line, homeowners can effectively shut off the water supply to a sink without a dedicated valve, facilitating necessary repairs or maintenance with ease.


