
A rotting window frame can be a source of frustration and concern for homeowners. Not only does it compromise the aesthetics of your home, but it also poses potential structural and energy efficiency issues.
Rotting window frames are typically caused by prolonged exposure to moisture, which can lead to wood decay and deterioration.
However, the good news is that fixing a rotting window frame is a manageable task that can be undertaken with the right tools and techniques.
Homeowners have historically been proud of their wooden windows while complaining about their maintenance.
The classic aesthetic of these materials is certainly appealing, especially in heritage homes and period properties. However, the natural process of rotting can be a persistent problem.
Can A Rotted Window Frame Be Repaired?
It may be possible to patch up your problem area with epoxy wood filler if there is only a spot or two of wood rot on the window or windows in question.
In the event that your windows have wood rot, what should you do? To help you treat wood rot, we’ve put together this comprehensive guide.
Why Does Rot Occur In Wooden Windows?
The main reason why wooden windows are susceptible to rot must be highlighted before getting into the nitty gritty of rot prevention and treatment. Putting it simply, timber and water don’t get along.
It’s inevitable that rain or any kind of moisture will find its way into any cracks and gaps in your wooden window sills if they’re not properly maintained or protected.
In the end, the wood’s established cell structure is broken down. Despite not being completely absent, the original 19th-century windows were made with old growth wood, which was less likely to rot.
How To Fix Wood Rot Around Windows?
Here are the things you will need:
- A wide screwdriver or chisel
- Drill with a ¼ inch bit
- Wet rot wood hardener and wood filler
- A plastic or metal knife
- Brush
- Paintbrush, wood paint & painter’s tape
- Sandpaper of various grades
Today’s wooden windows are constructed using lesser materials and methods because of the ever-increasing demand, which requires extra effort from homeowners to prevent moisture intrusion.
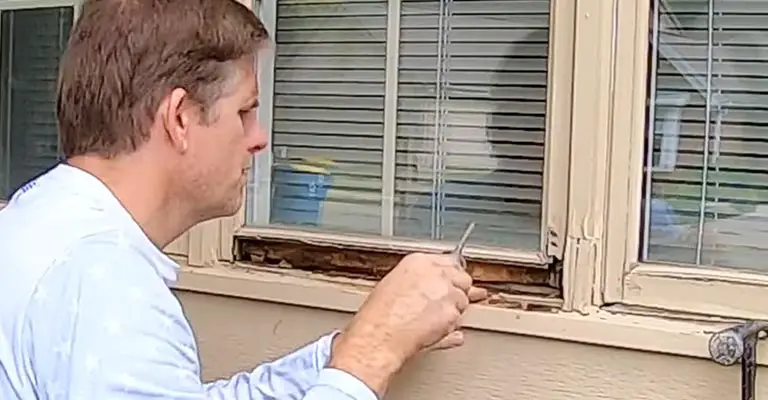
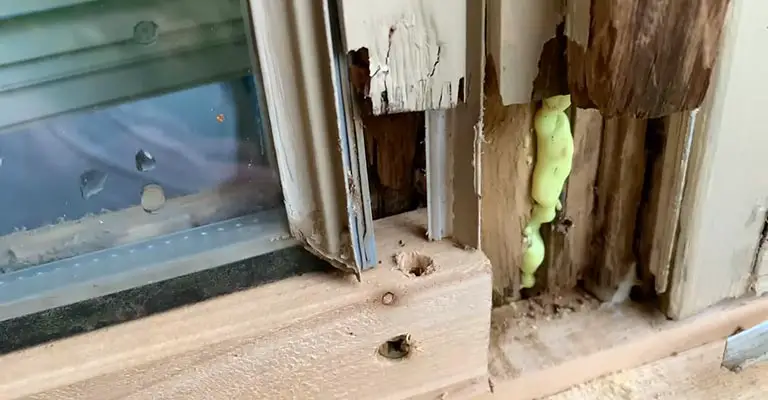
1. Find Out How Much Rot There Is
To begin, you need to determine how much rotted wood there is. When the frame is severely rotted (over 10%), it’s best to replace the windows rather than try to repair them.
When rotting occurs in excess, the window frame becomes unstable, which poses a security threat.
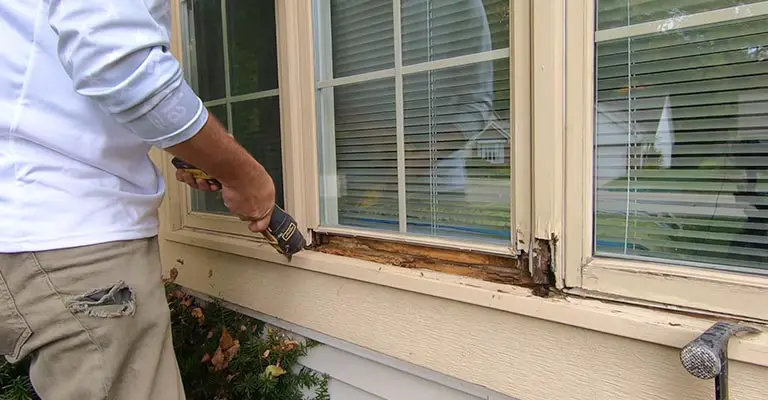
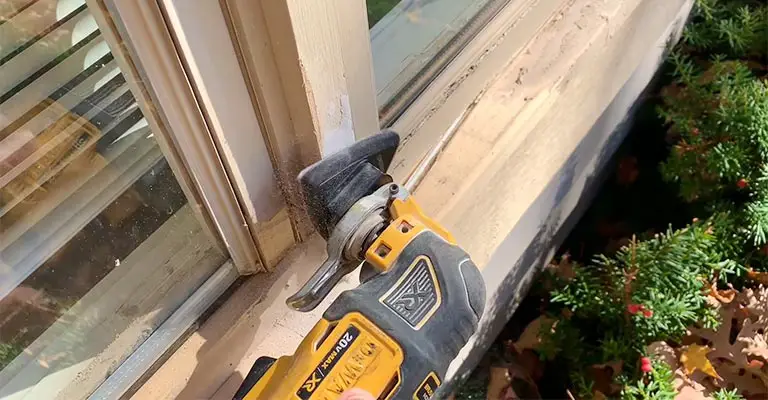
2. Removing The Rotted Areas
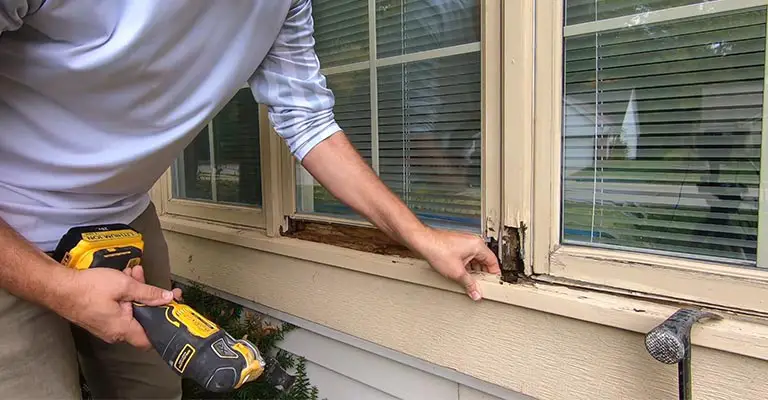
You may need to use your chisel or screwdriver to pry the rotten wood from the framing until you reach the healthy wood underneath. If any debris remains after you’ve removed the rot, use the brush to remove it.
3. Make A Few Holes With A Drill
Spacing the holes about an inch apart, drill some holes into the healthy wood. In this way, the wood filler will have a firm grip on the wood. Afterwards, clean away any debris and dust that have been created.
4. Fill The Wood With Wood Hardener And Wood Filler
The affected area should be treated with wood hardener, and holes should be filled with wood hardener as well.
Apply a second coat after the first has dried. Before applying the filler, this will reinforce the wood.
Fill in the frame with generous amounts of filler and mold it to the shape of the frame.
Use a plastic or metal knife to press the filler into place and allow it to dry according to the manufacturer’s instructions. Before moving on to the next step, ensure that the filler is dry.
5. Gently Sand The Surface
When the filler is dry, sand the repaired area so it’s level with the rest of the frame using various grades of sandpaper. To achieve a smoother finish, start with a coarse grade.
6. Apply Paint To The Wood
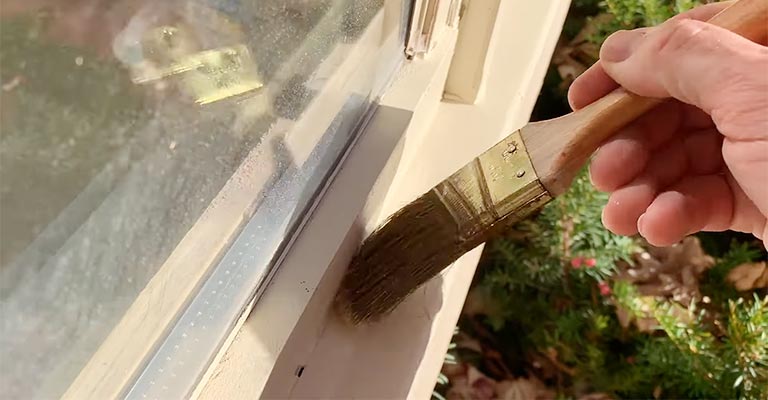
Firstly, you should choose exterior-grade wood paint. You should also make sure that the color of your new window frames matches the current ones for a consistent finish.
Before painting the frames, protect the glass with painter’s tape, then proceed to paint the frames. However, it’s highly likely that the rot will have weakened the frame, potentially compromising the security of the window.
Although this method allows replacing rotted wood around a window, it’s highly likely that rot will have caused the frame to weaken.
Despite the fact that rot repair may provide a temporary solution, we recommend replacing the windows to ensure your home remains secure.
Installing Replacement Pieces for Badly Rotted Wood
Rot occurs frequently in older homes, particularly around unsealed areas such as windows.
Rotten window frames, on the other hand, can cause further structural damage to your home, including mold growth, deteriorating insulation, and crumbling framing.
Thankfully, you don’t need to spend a lot of money or time on replacing the wood around a window.
Epoxy can be used to fill the majority of small spots. Removing an entire section of trim or sill that has extensive rot and replacing it with a new one is the best method of repairing it.
Having the sash rebuilt by a specialist is the best way to ensure the job is done correctly if there is damage to it.
Step 1
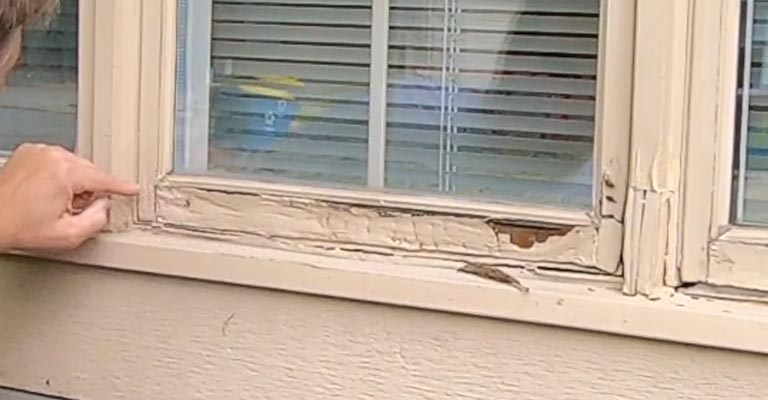
Make sure the entire window is inspected to determine the extent of the rot. By pressing down on the wood with your fingers or a small hand tool, work your way around each edge of the frame.
Feel for areas that feel spongy or soft. There are often visible signs of decay in these locations, such as chips, splinters, peeling paint, and discoloration.
Identify the exact point at which normal, healthy wood becomes rotten in areas with multiple boards or smaller pieces.
Your project will be more cost effective and labor efficient if you preserve as much intact wood as possible.
Step 2
Remove the entire rotted section by cutting or prying it out. Use a prybar to loosen the affected trim and casing pieces, then pull them free by hand.
Try to maneuver a reciprocating saw or skills saw into tight spaces if you find yourself stuck with a piece you can’t move.
The healthy wood beneath the rotted wood will be just visible if shallow cross cuts are made. Using your prybar, force the wood out after scoring it.
Scraping wood pulp from joints and gaps may also require an awl, putty knife, or similar tool.
It is important to work carefully so that no unnecessary damage is done to the siding or sheathing nearby.
Once the window sash has been removed, unhook the balances from the inside of the frame.
Tip
If the construction of your window is particularly complicated, it may be a good idea to take a picture before dismantling it. By doing so, you’ll have a reliable reference that will show you how everything is supposed to fit together.
Step 3
Take individual measurements of each piece you remove. When you pull each element from the window, measure its length, width, and thickness with a ruler or measuring tape.
Be sure to record your measurements on a separate sheet of paper and label them correctly. As closely as possible, you should match these dimensions when replacing your materials.
Keep a note of features that stand out, such as mitered corners or fastening sites, so that you can replicate them later.
Step 4
Make sure the exposed sheathing underneath is sealed. Before you can proceed with installing replacement pieces, you must address visible openings around the edges of the window.
Small and medium cracks should be filled with caulk or sealant tape, and larger openings should be filled with expanding spray foam insulation.
To prevent any further moisture from entering the structure, you can also install adhesive flashing in the areas that show signs of water damage.
Many older homes have cracked and gapped board sheathing.
A small crack can become a big one in a matter of minutes if you don’t seal every aperture that you can access.
Step 5
Replace the rotted wood with new wood. To ensure your replacement wood is exactly the same size as the original, use the measurements you took earlier.
Ensure that your cuts are clean and neat so you can simply slip the new piece into place without adjusting it.
Make sure the ends of decorative molding are mitered to a 45-degree angle. Also, ensure the wood you choose matches the original component’s thickness and grain texture.
Have your local home improvement center examine a photo or sample piece of healthy, intact wood from your window if you aren’t sure what type of wood was used.
It can be easier to line up multiple 90- and 45-degree angled cuts quickly and accurately using a miter box or speed square.
Step 6
Galvanized nails should be used to install the new pieces. The most commonly recommended method for securing window trim is to use 8D finishing nails.
Each piece should be nailed at the top and bottom corners, then at the center. You will need to repeat this process for each element you are installing.
Place additional nails along the length of your new pieces 16 inches (41 cm) apart in pairs if you have particularly large windows.
Make sure sunken nail holes are level with the wood surface by filling them with wood putty.
Step 7
Replace any damaged pieces with new ones. Apply 2-3 coats of exterior paint in the same shade as the intact elements surrounding the area.
Before starting on the next coat, allow each coat to dry for the amount of time recommended by the manufacturer.
On unfinished wood, you will need to apply two coats for complete coverage.
If you’re improving an older home and can’t identify the exact shade of paint used, try to match it as closely as possible.
When comparing colors, you can use paint chips or an app that matches colors. Repainting all of the window trim is another option.
You won’t end up with color inconsistencies if you get a brand-new paint job. The existing paint may need to be repainted anyway if it’s fading.
Can I Avoid Wood Rot Around My Windows?
Traditional wooden windows cannot be completely protected from wood rot, but there are a few things you can do to prevent it from occurring.
Can This Method Be Used To Repair Rotted Windowsills?
A rotted windowsill can be repaired using this method. The window’s structural integrity might be compromised, however, if the sill has large areas of rot.
If your windowsills are rotted, you might be able to replace them yourself, but we recommend hiring an installation professional to replace all the windows.
The main purpose of this is to ensure that there are no security risks involved.
How Do You Fix A Rotted Window Sash?
If it is only the window sash, remove it, unhook the balances, and then have someone rebuild an identical wooden sash.
Final Words
Keep wiping, wiping, and wiping. As a homeowner, the most effective way to prevent rot in wooden windows is to watch the frames carefully. Wipe away any moisture build-up that occurs, even if it is only a slight amount.
There’s only a need for an occasional one, and you can save yourself a lot of trouble in the long run with one. Inspect the paint for any cracks, peels, or gaps, and sand them down and repaint them if necessary.


