
Are you tired of dealing with unpleasant sewer odors in your home? A plumbing loop vent is a solution to this problem!
Not only does it prevent the backflow of sewer gases, but it also maintains proper air pressure in the pipes, making your drainage system work more efficiently and safely.
The pipes can become blocked without a loop vent, leading to unpleasant odors and even health hazards. In this guide, we will explain how to make a plumbing loop vent for your drainage system.
We will cover everything from selecting suitable materials to installing the vent properly and ensuring your drainage system works efficiently and safely.
With the right tools and basic knowledge, you can easily make a plumbing loop vent and save money on hiring a plumber.
Make your plumbing loop vent by following these instructions. Ensure the loop vent diagram is labeled clearly and measure the pipe length.
Making loops guided by plumbing codes between the P-trap and the drain and stack vent using elbows and tees.
By reading the article, learn how to make a loop vent while understanding the purpose of the vent in your homestead.
What Is A Loop Vent?
Loop vents are venting solutions for sink fixtures that require plumbing to run under the floor, such as kitchen island sinks.
Before reaching the vent stack, it rises from the trap, loops inside the sink cabinet, then drops beneath the floor.
What Is The Purpose Of A Loop Vent?
Air freshens up your house, making it more comfortable for you to live there. You may not realize it, but your bathroom and toilet waste can make your home smell like a dump.
Your house requires fresh air to be circulated and ventilated through loop vents. You can use a loop vent to provide continuous fresh air flow through the drain pipe in your house.
The plumbing loop vent loops around the fixture so that it is able to ventilate as much as possible. It emits waste gases to the environment from a high point above the housing structure.
Loop vents have been designed so that waste can flow to the wet vent and drain pipe, and fresh air can circulate through the dry vent.
This sink has a trap that keeps the water from returning to the house so gasses cannot enter the house. Toilet loop vent traps are located inside sinks, while sink traps under kitchen islands are located beneath sinks.
The Importance of Venting
The vent system serves two essential functions in a building’s plumbing system. First, sewer gasses must be dissipated into the atmosphere outside the building to prevent us from inhaling them.
Even though that is important, it is not the system’s primary function. To equalize the pressure in the pipes, air must be allowed into the pipes.
Pressure differentials are generated by water flow in drain pipes in two ways. Water’s head generates positive pressure in front of it and negative pressure behind it, resulting in a partial vacuum.
As a result, they slow water’s flow and sometimes even stop it. Similarly, as plumbers discovered immediately after the invention of the P-trap in the mid-1800s, negative pressure can also suck water out of fixture P-traps.
It is normal for a P-trap to be filled with water at the bottom to prevent sewer gases from entering a residence.
Since the advent of venting, every plumbing code has required that each drain be connected to a vent pipe connected to a main vent stack.
It is illegal to install a drain with no vent, but there is one exception. You do not need vents in bars and soda fountains if the drain empties into sinks or other receptors with vented drains.
How To Make A Plumbing Loop Vent?
To keep your house from overheating, you should install a plumbing loop vent. First-time installers often have a difficult time installing vent plumbing in a house. Nevertheless, we will show you how to make an easy plumbing loop vent.
Tools And Equipment You Need To Make A Plumbing Loop Vent
If you want to make your work easier, get the following items.
- PVC plumbing vent pipe
- Elbows – 45°, 90° Y fitting
- Sanitary and vent tee
- Pipe cement
- Tape measure
- Hacksaw
1. Draw the Loop Vent Diagram
Make a scale drawing of the loop vent diagram. Make sure you label the different parts on the diagram. Ensure that you label the appliance with the correct measurements according to the manufacturer’s instructions.
Be sure to specify the type of elbow and tee to be fixed. Having finished the diagram, it is now time to shop for the items.
2. Measure And Cut The Pipe
In your diagram, add the lengths and convert them to millimeters or another suitable unit. You should measure the length between the P-trap and the stack vent.
To measure the distance from the top of the vent to the floor, use the tape measure (approximately 6″ above the p-trap).
At cutting points, make marks with a marker pen. Ensure that there is enough space for the connectors. Sandpaper can remove burrs from the pipe after it has been cut with a hacksaw.
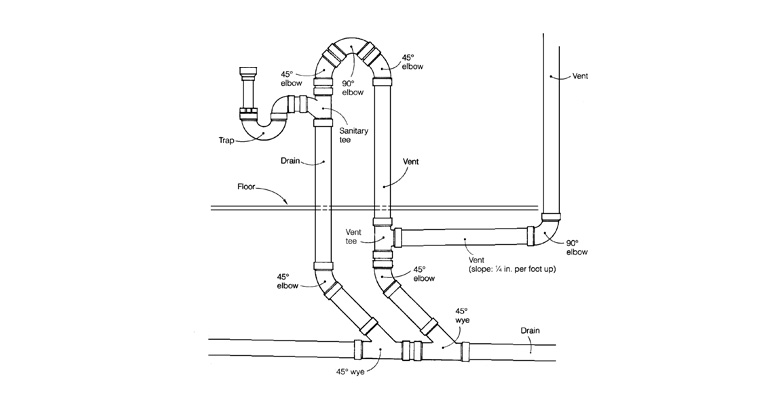
3. Attach The Loop Vent To The P-Trap
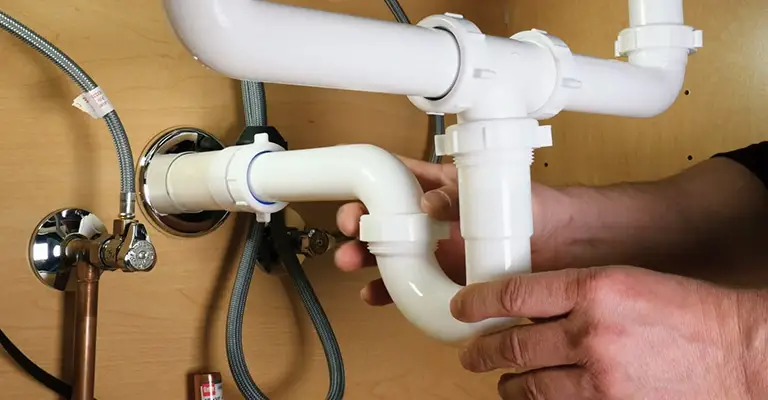
An unblockable plumbing loop vent should be connected to a sanitary tee. By using the sanitary tee, you will be able to add extra joinery.
Ensure that the slanting side of the sanitary tee faces down towards the drain pipe. Seal the connections with plastic pipe cement to prevent leaks.
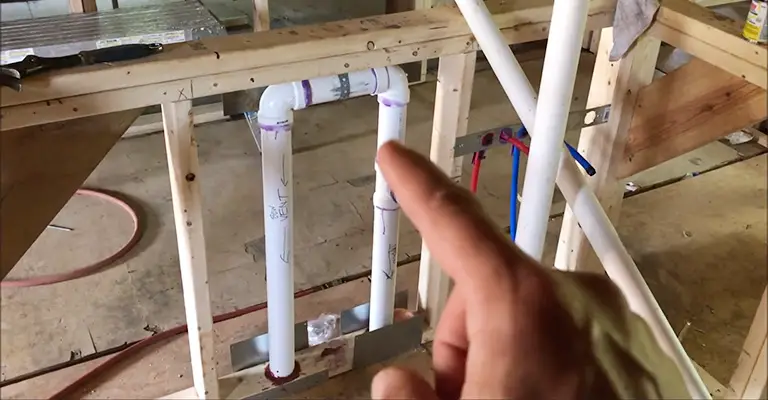
4. Create the Loop
Construct the loop by connecting the sanitary tee to the P-trap and drain pipe. You will need to fix a piece of pipe vertically to achieve the standard height. It is standard to have a 6″ height above the P-trap.
An elbow with a 45° angle should be connected to the vertical section of the extension pipe. A 90° elbow can be connected to the top end of the 45° elbow to curve the loop.
Create the top loop by attaching another 45° elbow downwards. To make the joints watertight, glue them together. The code lengths must be correct to ensure that the loop’s top end touches the countertop’s bottom side.
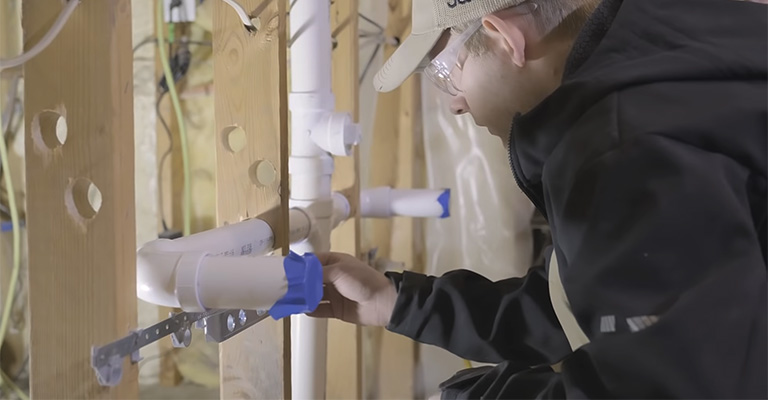
5. Tie The Loop Vent To The Stack Vent
Make a cut in the PVC pipe and fix it to the lower end of the elbow 45°. You will need a tee to connect the loop and the stack vent at the ground level.
There should be an upward slope on the ground in that section to allow air to circulate and waste to drain. Stack vents can connect pipes using a Y-fitting or 90° elbow.
6. Connect The Loop Vent To The Drain Pipe
You can slant the pipe by connecting a section of pipe into the remaining opening of the vent tee with a 45° elbow. You will need a 45° wye to finish the loop connection at the drain pipe joinery point.
This part drains away any water that may accumulate during the dry venting process. Your plumbing loop vent has been installed, and you will no longer suffer from foul odors in the house.
Note:
We will install a plumbing loop vent for sinks in the process above. Fortunately, this project can also use homestead appliances that require venting.
It will be similar to creating a plumbing loop vent for a toilet or bathroom, but it may require the services of a plumber to complete.
Where Can You Use a Loop Vent?
It’s important to note that the code only specifies loop venting for kitchen islands and lavatories and not for toilets or other fixture drains, such as clawfoot bathtubs or stand-alone showers.
A loop vent cannot be used on a vessel sink because its drain is located above the counter. After all, the loop must rise at least as high as the drain opening. A common vent stack can accommodate many loop vents.
If you have more than one sink or island in your kitchen, then each sink drain P-trap will have its vent loop.
These can be connected to a common vent that leads to the vent stack. The tie-in point must be at least 6 inches above the flood level of the highest fixture in this configuration.
Can a Plumbing Vent Have an Elbow?
In fact, yes. It is necessary to have elbows on plumbing vents. There is an elbow between the loops.
In most cases, 45-degree elbows are required to make loop junctions at 45-degree angles. In cases where a joint is right-angled, use an elbow that is 90 degrees.
A 45-degree wye, sanitary tee, and vent tee are also required to connect pipes larger than two. The elbows are only one part of the process. To ensure a seamless loop without leaks, connectors are essential.
Don’t hassle yourself with replacement connectors and elbows by buying high-quality ones. To create momentum for the flowing liquids, combine wye with a 1/8″ bend at the baseline where the loop is connected to the drain pipe.
How High Does a Loop Vent Need to Be?
Plumbing codes require a loop vent to have a lift not more significant than six feet. There should be no more than eight feet for maximum vent heights.
Any loop vent near an opening in the house should be more than 1000mm above the eaves. So that the waste gasses will not blow back into the house, and this will prevent the wind from blowing them there.
Give your island loop vent an allowance of 1m above the rooftop once it protrudes above the roof. Ensure the loop end is covered with a perforated lid to prevent air from entering.
Final Words
You can improve your living conditions by installing efficient loop vents in your kitchen island and washroom. To avoid frequent replacements, purchase quality pipes and elbows.
For the loop to be fixed appropriately, it is necessary to have the correct appliances and measurements. Install the loop vent at the inclination angles prescribed to achieve a good result.


