
Picture frames are usually hung on a wall to show off pictures and artwork. There are many different types of frames.
And they can be hung in many different ways depending on what type of wall they are going on and what kind of art or pictures they will display.
Hanging frames on a wall with metal studs can seem daunting. However, the steps are easy if you have the proper tools. A wall anchor in the drywall would be appropriate if the artwork or framed mirror is heavy.
After drilling the hole, inserting the anchor, and driving the screw, you’re ready to install the fixture. In this case, the anchor expands behind the drywall.
After that, turn it back a few turns and hang it on the back of the frame. To install the machine screw, drill a pilot hole on the metal stud, and then use a screw larger than the pilot hole you drilled.
Steps For Finding A Wall Stud
Have you ever wanted to hang a picture or mirror on your wall? Learn to find your wall stud before getting a hammer and nail.
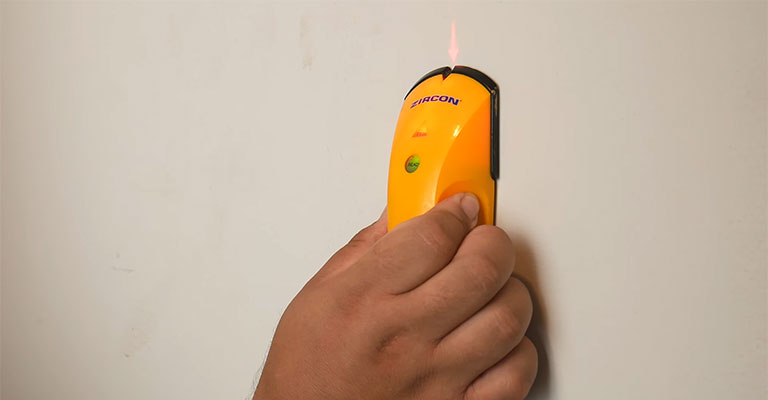
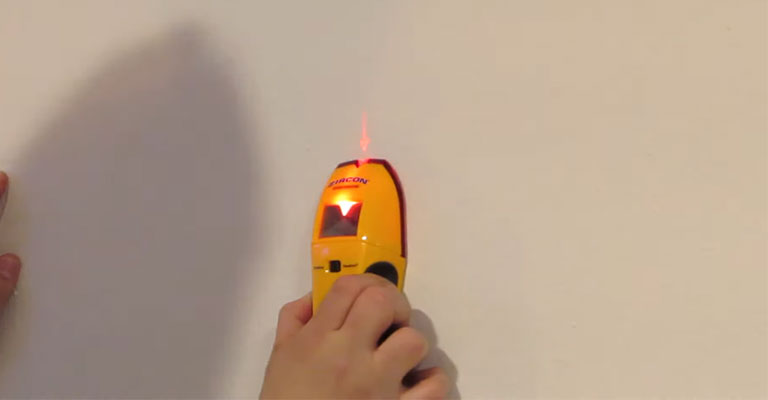
You can find the framing behind the drywall with a stud finder, but that does little good if you don’t have one in your arsenal of tools.
In addition to being frustrating to use, stud finders often deliver false positive results or fail to detect anything.
1. Use A Stud Finder
You’ll find more uses for a stud detector than just hanging one heavy frame, so there’s no shame in keeping one in your toolbox.
A stud’s secure hold can benefit many items, including floating shelves, bathroom mirrors, and flat-screen TVs.
2. Use A Magnet To Locate Metal Fasteners
With a magnet, you can easily detect studs. For example, you can use the magnet to locate the metal screws to attach the drywall to the studs but not see wood studs.
There is one thing you can’t use just any magnet from your fridge. Neodymium magnets are the strongest commercially available since the screw heads will likely be covered by spackle.
3. Measure 16 Inches From The Corner
In addition, measuring from a corner of the room is another way to calculate since studs are typically 16 inches apart.
However, you will likely have a stud located less than 16 inches from a corner since all rooms aren’t built-in numbers divisible by 16.
Find out where the shorter stud spacing might have been added by using the “knock test” near the corner. It’s likely that you won’t find any framework behind the drywall if you hear a hollow sound when you knock.
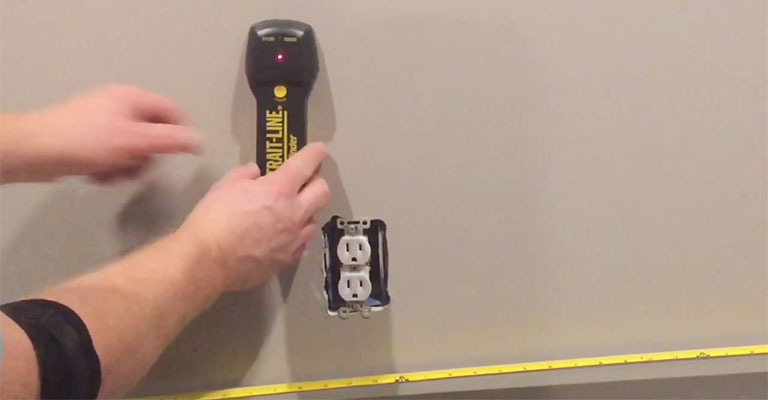
4. Locate The Switches And Outlets, Which Indicate A Stud

You can find the stud by looking for a light switch or electrical outlet if the baseboards don’t indicate its location. Almost all electrical boxes must be mounted to studs on at least one side.
By tapping on either side of the switch or outlet, you can determine which side of the box the stud is on. It is the stud side that produces a solid sound, as opposed to a hollow one.
To determine the 16-inch intervals of stud spacing, measure ¾ inches away from the outlet on the stud side.
How Do I Hang Pictures On Metal Studs? What Screws Should I Use?
We recommend attaching heavy objects directly to studs when hanging them on the wall. When you have steel studs, it may be necessary to block up the steel studs before building a wall.
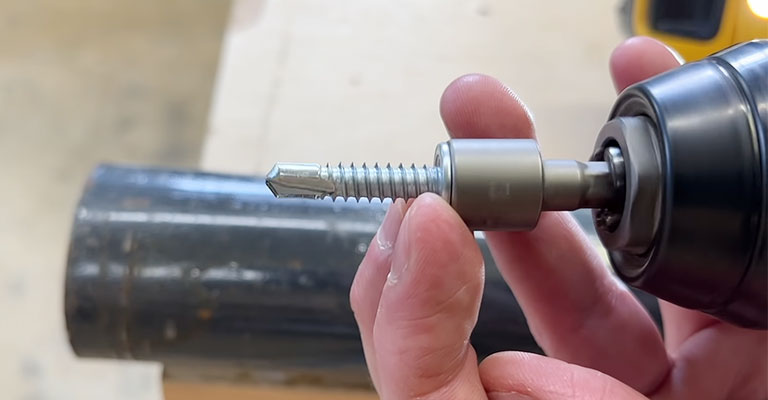
You may need to use special attachment tactics to attach directly to a steel stud without blocking it with wood. Pictures cannot be hung on metal studs with nails.
Instead, self-drilling screws with fine steel plating are required. Using drywall screws with a standard Phillips or pan head is best.
It costs about five dollars for a box. Most homes’ framed art can be handled in this manner. It is not necessary to use wall anchors.
Combine a screw with a hooked picture hanger for best results and earthquake resistance. If your frames are large or heavy, you will need a heavy-duty method of hanging them.
1. Locate The Stud
The center of the stud can be determined with the help of a stud finder. Make a pencil mark on the wall where you want the mark to go. When measuring, take the wire into account.
Make sure your electric drill is freshly charged. For safety, use a ladder and a spotter if the picture is to be hung high. Standing on a chair is not a good idea.
2. Before You Drill
Your electric drill or screwdriver gun should be loaded with the Phillips head drill bit. You need to tighten the chuck. Protect your eyes with safety glasses.
The Fitbit’s tip should be aimed at the screw’s head. Using the pencil mark as a guide, place the screw tip on it. Take your time to squeeze the trigger.
3. Drilling The Screw
Squeeze the trigger lightly while drilling in the screw. Don’tDon’t be afraid to put your weight behind it. Upon passing through the metal stud, the screw head will pop.
If you want to hang a picture, stop when the screw head pokes out from the wall and leave 1/8 of an inch around the screw head.
4. Hanging The Picture
Prior to hanging the artwork, ensure that it is firmly secured in the frame. If a wire, d-rings hang the picture, or a sawtooth hanger, make sure the wires are tight and secure. You should be able to grip the wire with the picture. Then, observe from a distance and level it out.
How Are Steel Studs Changing The Way We Decorate?
You may believe that hanging your kitchen cabinets or mounting your plasma TV is as easy as hanging them on your own. Hanging a towel bar is no difficult task for do-it-yourselfer.
However, steel framing presents several challenges compared to wood studs, making DIY chores easier but more challenging.
The density of steel is much higher than that of wood, for starters. Therefore, to drill through it, special equipment is required. Additionally, drills through metal may occasionally produce small sparks, which may spark a fire.
The majority of contractors advise avoiding drilling through steel studs whenever possible. The anchoring of relatively lightweight objects can be accomplished without drilling through any of the studs.
It is possible to secure items in drywall with drywall anchors. However, there are several advantages to using wing plastic anchors over ribbed ones, including their low cost and lower risk of pulling out.
Many drywall anchors boast a holding power of up to 50 pounds each; these anchors are even stronger. It is common for decorators to use 80-pound strap toggle anchors for larger jobs, like attaching mirrors or shelving.
No matter how strong the drywall anchors are, the material is soft, making them a poor choice for drywall installations.
Things with a heavy front, like towel bars or shelving, tend to pull away over time. A hole can be drilled through metal studs for hanging items that need more support. It is best to bore through metal with titanium or cobalt drill bits.
To safely secure heavy items to the metal stud, drill your pilot holes and use a toggle bolt. The drywall could also be cut open and small sections of wood secured between the steel studs could be attached to the wood before very heavy items were attached to it.
Final Words
There are a lot of advantages to metal stud framing over wood framing, but one of them is that it is easier to decorate. Steel-stud walls can be hung with pictures, mirrors, shelves, and even televisions with the right tools.
When you understand the anatomy of a wall, you can use one of the above methods to locate a stud, potentially eliminating the need for an additional tool.
Furthermore, DIYers can use these techniques to verify that a stud finder’s readings are accurate before making a hole in a wall, even if they already own a stud finder. When drilling holes in your walls, use caution regardless of your strategy.
A drill bit can cause personal injury or damage to your home if you strike wiring, plumbing lines, or gas pipes in the interior walls. Therefore, before setting up your drill, it is a good idea to be reasonably certain where the stud is.


